Prediction and Optimisation Run-time

General Description
The Prediction and Optimisation Run-time component encapsulates data processing algorithms and seamlessly integrates them in the ZDMP platform. It uses the data management tools from the ZDMP environment and provides an easy-to-use API through which other components or zApps may use the embedded algorithms. By deploying an algorithm as a Prediction and Optimisation Run-time (PO Run-time) it is hosted in a scalable manner that is available to all components/zApps that support the PO Run-time API. In contrast to most ZDMP components, a single instance of a ZDMP platform may host multiple versions of the PO Run-time component. More precisely each user can start multiple instances of PO Run-time.
A potential workflow to create and run a Prediction and Optimisation Run-time is as follows:
Identify data processing problem
Use the Prediction and Optimisation Run-time Designer to search for available algorithms that solve the problem
Adapt the data processing algorithm to needs or write a new algorithm from scratch. This step may also include training the model using test data
Use the Prediction and Optimisation Run-time Designer to embed the finished algorithm/model inside a PO Run-time
Run and use the PO Run-time throughout AI Analytics Run-time component in the ZDMP platform
The component consists of three Docker containers:
A Gunicorn Sever (WSGI) that deploys the Python Flask application that implements the components main functionality (API, Layer, …)
A Redis database that serves as a cache for specific message bus topics
A Python script that manages message bus subscriptions and updates the local cache (Redis database). In the current version, a MongoDB database is also deployed to persist configurations. Later the MongoDB container will be replaced by the ZDMP Storage component
The data processing algorithms are developed independently and are later injected and used in the Prediction and Optimisation Runtime. For this to work, each data processing algorithm needs to implement the ComputeUnit sub-component which has a predefined interface. On the implementation level the injection is achieved using a Docker parent image (PO-base image) which provides core functionalities as a service (eg API and IO). The Dockerfile of the data processing algorithm (ComputeUnit) is based on this PO-base image, ie starts by importing it. Using this system, the data processing algorithm can be provided as a Python package to the main Flask application.
| Resource | Location |
|---|---|
| Source Code | Link |
| Latest Release (v1.0.0) | Download |
| X Open API Spec | Link |
| Video | Link |
| Further Guidance | None |
| Related Datasets | None |
| Additional Links | None |
| Generation date of this content | 26.Mai 2021 |
Screenshots
This component does not have a graphical user interface.
Component Authors
| Company Name | ZDMP Acronym | Website | Logo |
|---|---|---|---|
| Profactor GmbH | PROF | www.profactor.at |  |
| Universidad Politècnica de València | UPV | https://cigip.webs.upv.es |  |
Commercial Information
| Resource | Location |
|---|---|
| IPR Link | Link |
| Price | [For determination at end of project] |
| License | [For determination at end of project] |
| Privacy Policy | [For determination at end of project] |
| Volume license | [For determination at end of project] |
Architecture Diagram
The following diagram shows the position of this component in the ZDMP architecture.
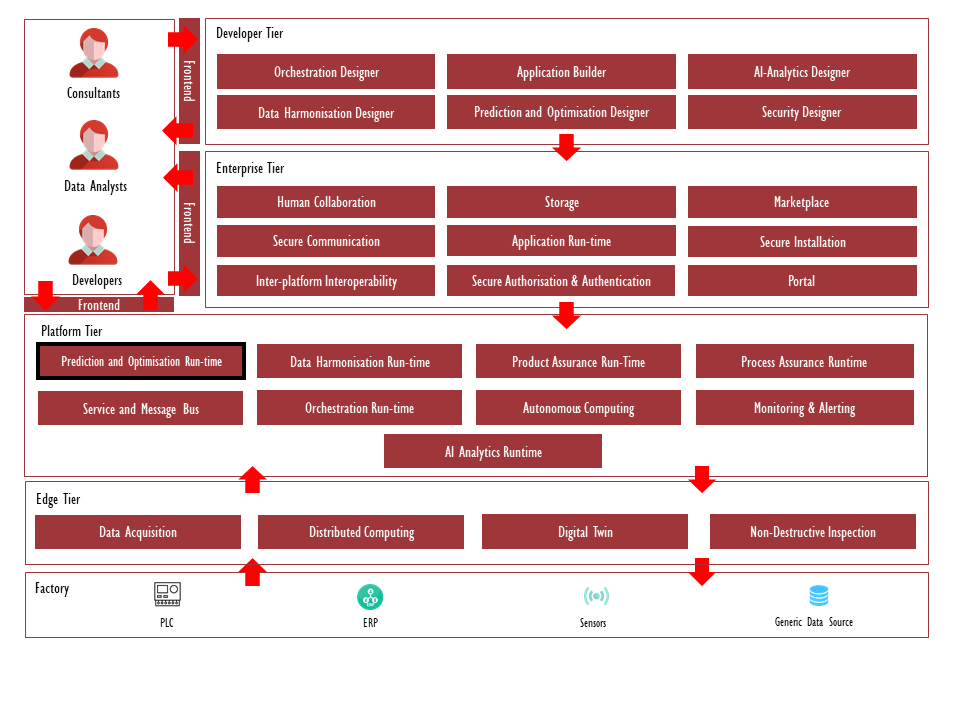
Figure 1: Position of Component in ZDMP Architecture
Benefits
The main advantages of deploying a data processing algorithm as a PO Run-time:
Seamless integration into the ZDMP platform. The main benefits are:
Efficient development to deployment in ZDMP platform
Easily access data published on the ZDMP platform
Share data processing results with components/zApps on the ZDMP platform
Standardised API which allows existing components/zApps to use the newly published algorithms
Features
This component offers following features through the API:
Data source selection
Output source selection
Continuous or one time calculation
Modification of algorithm parameters
Query the settings
System Requirements
The component may be run on any platform that support Docker images. To run the Flask application locally (ie without Docker) the following software requirements exist:
Python 3.7
Pip
Furthermore, to use all features, the following dependencies inside the ZDMP platform exist:
Message Bus: Used to get real time data
Storage: Used for persistence and historic data
Associated ZDMP services
Required
Optional
Installation
Installing from Source in Local Environment
This component is designed to be used with the AI Analytics component. However, it has the ability to be installed and used as a standalone component. The installation is based on Docker and can be achieved by running a Docker-compose command. For each data processing algorithm, a separate Docker-compose file is provided. For example, the following command starts an instance of the PO-Run-time component embedded with an anomaly detection algorithm for the HSD spindle data.
- Example start-up using Docker-compose (in Linux command line):
docker network create zdmp
cd orchestration
export MQTT_USERNAME=<username>
export MQTT_PASSWORD=<password>
docker-compose -f docker-compose.hsd_anomaly_detection.yaml -f docker-compose.mqtt-hsd-spindle-zdmpMB.yaml up --build --remove-orphans
Setting the environment variables MQTT_USERNAME and MQTT_PASSWORD allows the component to connect to the ZDMP message bus
Docker-compose.hsd_anomaly_detection.yaml: This Docker-compose-file builds the data processing algorithm and embeds it into the main PO-Run-time Dockerimage, which includes a python-flask application, a mongo database, a redis database and a python-script:
---
version: '3.4'

services:

  hsd_anomaly_detection_backend:
    build:
      context: ../subsystems/layers/Prediction/hsd_anomaly_detection
    container_name: hsd_anomaly_detection
    environment:
      - LOG_LEVEL=info
      - LAYER_MODULE_NAME=hsd_anomaly_detection
      - MQTT_BROKER_REQUIRES_PW=True
      - MQTT_BROKER=zdmp.digitalbusinessplatform.de:18083
      - MQTT_USERNAME=upv
      - MQTT_PASSWORD=ZDMP2020!
    ports:
      - '8082:3000'


networks:
  default:
    external:
name: zdmp- Docker-compose.mqtt-hsd-spindle-zdmpMB.yaml: This Docker-compose file runs a python script which publishes pre-recorded spindle data on the message bus:
---
version: '3.4'

services:
  mqtt-publisher:
    container_name: mqtt-pub-container
    build: ../subsystems/data/mqtt-hsd-spindle
    environment:
      - LOG_LEVEL=debug
      - MQTT_BROKER_REQUIRES_PW=True
      - MQTT_BROKER=zdmp.digitalbusinessplatform.de:18083
      - MQTT_USERNAME=upv
      - MQTT_PASSWORD=ZDMP2020!
The Dockerfile of the anomaly detection backend service is defined as:
FROM zdmp-gitlab.ascora.eu:8443/zdmp_code/platform-tier/t7.1-t7.2-t7.3-prediction-and-optimization-run-time/backend:1.5

# Set up working directory
WORKDIR /usr/local/app/layers

# Install package
COPY ./hsd_anomaly_detection ./hsd_anomaly_detection
COPY README.md setup.py ./
RUN pip install .
Thus, in summary, the Docker compose file deploys the anomaly detection backend service and other required services such as the mqtt publisher that simulates the data. The Docker file builds a container image, first pulling the PO runtime base image from the container registry of ZDMP, and installs dynamically the Python package with the anomaly detector in the runtime. The environment variable LAYER_MODULE_NAME controls the name of the module that implements the data processing module in the runtime. Following these steps a module can be installed with the implementation of a data processing algorithm in the runtime, using a specific image available in the registry. Note that the PO Designer provides development tools to facilitate this process.
It is also possible to use Docker and Docker compose to build the PO runtime base image from source code, instead of using one of the official releases in the ZDMP Docker registry. Docker compose allows to build and name an image and reuse it in another service. Based on this feature, the following alternative docker-compose.buid_base_image.yaml builds an image from source:
---
version: '3.4'

services:
  base_backend:
    build: ../subsystems/backend
    image: po_backend:0.1
Now, the Dockerfile of the anomaly detection backend service is:
FROM: po_backend:0.1

# Set up working directory
WORKDIR /usr/local/app/layers

# Install package
COPY ./hsd_anomaly_detection ./hsd_anomaly_detection
COPY README.md setup.py ./
RUN pip install .
This will again install the packages with the data processing modules in the base image, except that now in this case, the base image is built with a different docker compose file, instead of using the ZDMP registry, thus allowing developers to modify, or debug the PO Runtime backend locally.
Installing from Source in the AI Analytics Runtime
Developers may wish to install a new data processing unit in the AI Analytics Runtime from source. This guide covers the steps that developers need to reproduce to install a new PO Runtime in the AI Analytics Runtime:
- Create a manifest.json file following the AI Analytics Runtime manifest file specifications. The following example shows the manifest file of the anomaly detector used in the examples above:
{
  "name": "electrospindle_simulation",
  "description": "This Electrospindle simulator emulates the power consumption and the torque (rotation force) of a electrospindle based on the rotation speeding performed",
  "tags": [
    "simulator",
    "electrospindle"
  ],
  "version": "1.0",
  "input": {
    "runtime": [
      {
        "type": "REST_API"
      }
    ]
  },
  "output": {},
  "modelData": {
    "type": "DOCKER_LAYERS",
    "payload": {
      "envVars": {
        "MQTT_BROKER_REQUIRES_PW":"True",
        "MQTT_BROKER":"zdmp.digitalbusinessplatform.de:18083",
        "MQTT_USERNAME":"upv",
        "MQTT_PASSWORD":"ZDMP2020!"
      },
      "layers": [{
        "name": "electrospindle_simulation"
      }]
    }
  }
}- Create a ZIP file: Once that the manifest file is defined, you need to create a ZIP file with the files and file structure expected by the AI Analytics Runtime to load a new PO runtime Python layer, For instance:
| Anomaly_detection_layer
|-->hsd_anomaly_detecion
|-->Dockerfile
|-->manifest.json
The ZIP file must contain the files used in the Dockerfile (in the example above, the files of the Python packages implementing the data processing functions), the Dockerfile, and the manifest.json. Note that the Dockerfile must build the docker image from the PO Runtime base image in the registry, and not from an image built from source. As in the previous section, it is important to note that the PO Designer provides development tools to facilitate this process. More specifically, the PO Designer provides project templates with the required structure and CI/CD pipelines to automate this process.
How to use
The API functionality can easily be tested using the Swagger UI, which is currently deployed with the Flask application. For the hsd_anomaly_detection layer the following steps provide a working example:
- Click on POST ‘/subscription’, ‘Try it out’ and copy the following JSON into the Request body-field.
```json
{
“inputs”: [
{
“format”: “mqtt”,
“id”: “time”,
“mqtt”: {
“topic”: “t7_1-t7_2-t7_3-prediction-and-optimization-run-time/hsd/spindle/time[sec]“,
“historyLength”: 60
}
},
{
“format”: “mqtt”,
“id”: “vibration”,
“mqtt”: {
“topic”: “t7_1-t7_2-t7_3-prediction-and-optimization-run-time/hsd/spindle/vibration-speed-[mms]“,
“historyLength”: 60
}
},
{
“format”: “mqtt”,
“id”: “rotation”,
“mqtt”: {
“topic”: “t7_1-t7_2-t7_3-prediction-and-optimization-run-time/hsd/spindle/rotation-speed-[rpm]“,
“historyLength”: 60
}
},
{
“format”: “mqtt”,
“id”: “temperature”,
“mqtt”: {
“topic”: “t7_1-t7_2-t7_3-prediction-and-optimization-run-time/hsd/spindle/temperature-Statore-[C]“,
“historyLength”: 60
}
}
],
“module_parameters”: [],
“outputs”: [
{
“format”: “mqtt”,
“id”: “result”,
“mqtt”: {
“topic”: “t7_1-t7_2-t7_3-prediction-and-optimization-run-time/poResult”
}
}
]
}
Click Execute
The result will be posted on the message-bus and may be viewed using any mqtt-software
API specification
The following table contains the main details of the API specification:
| Resource | POST | GET | PUT | DELETE |
|---|---|---|---|---|
| /metadata | Not supported | Provides a description of the Run-time component, including a description of inputs and outputs | Not supported | Not supported |
| /result | Run the model with the current input and output configuration | Not supported | Not supported | Not supported |
| /subscription | adds a “subscription” to the list of subscriptions | returns the list of subscriptions | Updates the subscription with ID idx | deletes the subscription with ID idx |
The term “subscription” is used in the context of continuous (as opposed to one time) calculations. A “subscription” is a configuration (similar to the body of POST request “result”) where at least one input is of type “mqtt”.
Input / Output data configuration parameters specification
Simplified schema of the body of the POST requests “subscription” and “result”:
```json
{
“inputs”: [
{
“id”: “string”,
“format”: “string”,
<format>: string
}
],
“module_parameters”: [
{
“id”: “string”,
“format”: “string”,
<format>: string
}
],
“outputs”: [
{
“id”: “string”,
“format”: “string”,
<format>: string
}
]
}
The JSON body of the POST request to /result or /subscription consists of three keys (‘inputs’, ‘outputs’ and ‘module_parameters’) which are lists of JSON objects with the following structure:
id: Identifier of the input or output parameter, specified in the metadata of the component
For input/module_parameters: The name of the argument of the “compute” function (of computeUnit) to which the input should be passed
For output: The computeUnit returns the results as a python dictionary. The “id” refers to the key of the returned dictionary
format: Specifies the format of the input or output data parameter. The values of this key can be “filename”, “mongo-collection”, “collection”, “mqtt”
depending on the value of key “format”, (in the schema above), the key <format> should be replaced with one of the following keys:
filename: (Optional) For file/csv inputs, specifies the file name of the file containing the input data. Currently the files must be available in a Docker-volume made available using Docker-compose. Later the CSV files will be in the Storage component
mongo-collection: (Optional) For database/mongo inputs. This config is a JSON that specifies the ‘mongo_uri’ and the ‘query’ details:
For input:
*mongo_uri:* Used to connect to the mongoDB
(Optional) *operation:* Either ‘find’ or ‘aggregate’, defines which operation is used to retrieve the data. Default is ‘find’ if not present
collection_name: The name of the mongo collection on which the operation is applied
If `operation==aggregate`: pipeline: The aggregation-pipeline. Has to be a string containing a python-dictionary, eg: `“pipeline”:”[{ ‘$match’: {‘IdTool’:4} }]“`
(Optional) If `operation==find`: query: The query. If no query is given ‘{}’ is used instead. Has to be a string containing a valid python-dictionary, eg: `“query”:“{ ‘IdPart’: {‘$gt’:3} }”`
For output:
mongo_uri: Used to connect to the mongoDB
collection_name: The name of the mongo collection under which the data is stored. Note: The data is stored using mongoDBs ‘insert_many’
collection: (Optional) For collection data, contains the collection (data) in json format
mqtt: (Optional) For message bus data. This config is a JSON that contains the message bus topic to subscribe/publish to as well as an optional ring buffer length:
For input:
topic: The name of message bus topic
(Optional) historyLength: for ring buffer (which stores the stream data) length. Default is 1
For output:
- > topic: The name of message bus topic
Example JSON body:
```json
{
“inputs”: [
{
“collection”: {“A1”:1.131, “B2”:“C”},
“format”: “collection”,
“id”: “collection-input”
},
{
“format”: “mongo”,
“mongo”: {“mongo_uri”:“mongodb://cigip:cigip2020@mongo-container:27017/testzdmp?authSource=admin”, “operation”:“aggregate”, “collection_name”:“part_tools”, “pipeline”:“[{ ‘$match’: {‘IdTool’:4} }]“},
“id”: “tools”
},
{
“format”: “mqtt”,
“id”: “temperature”,
“mqtt”: {
“topic”: “t7_1-t7_2-t7_3-prediction-and-optimization-run-time/hsd/spindle/temperature-Statore-[C]“,
“historyLength”: 60
}
},
{
“format”: “mongo”,
“mongo”: {“mongo_uri”:“mongodb://cigip:cigip2020@mongo-container:27017/testzdmp?authSource=admin”, “operation”:“find”, “collection_name”:“parts”, “query”:”{ ‘IdPart’: {‘$gt’:3} }”},
“id”: “parts”
}
],
“outputs”: [
{
“format”: “collection”,
“id”: “result”
}
]
}