Application Run-time
General Description
This component provides the means to run and deploy Docker containers. It also provides several additional sub-components to give a useful minimum of core capabilities, eg a gateway, container registry, or service mesh. The components themselves are registered within the Application Run-time through the provision of manifest files which describe themselves and their offerings as well as the dependencies upon other components. The Application Run-time also comes with key components that are essential in allowing any of the ZDMP Assets (zComponents or zApps) to execute. These capabilities and the setup of the platform are managed by a web UI.
The Application Run-time uses a standard description of a component to allow it to manage all the components that run inside the platform. It uses a description of the resources themselves and what other resources they depend upon with the context of the platform. This meta data is stored in the docker labels and the Manifest files.
This Developer Tier components run externally to the platform. The Developer Tier is used to create platform conformant containers that can be generated and loaded onto the Marketplace. The platform can then install these containers from the Marketplace. These containers are then instantiated and thus can be accessed as a service. Note that many of the Developer Tier components such as the Orchestration Designer are by default on the Marketplace.
Individual ZDMP Assets within the system must expose a RESTful API to control and configure them. These control systems are registered with connections to the Services and Message Bus. This also allows data transfer through a message bus.
| Resource | Location |
|---|---|
| Source Code | Link |
| Latest Release (v1.0.0) | Link to use with VPN |
| X Open API Spec | Link |
| Video | Link |
| Further Guidance | |
| Related Datasets | None |
| Additional Links | Kubernetes Documentation |
| Generation date of this content | 12 May 2021 |
Screenshots
The following images are illustrative screen shots of the component.
Component Author(s)
| Company Name | ZDMP Acronym | Website | Logo |
|---|---|---|---|
| Information Catalyst for Enterprise | ICE | www.informationcatalyst.com |  |
Commercial Information
| Resource | Location |
|---|---|
| IPR Link | Application Run-Time |
| Price | [For determination at end of project] |
| Licence | [For determination at end of project] |
| Privacy Policy | [For determination at end of project] |
| Volume license | [For determination at end of project] |
Architecture Diagram
The following diagram shows the position of this component in the ZDMP architecture:
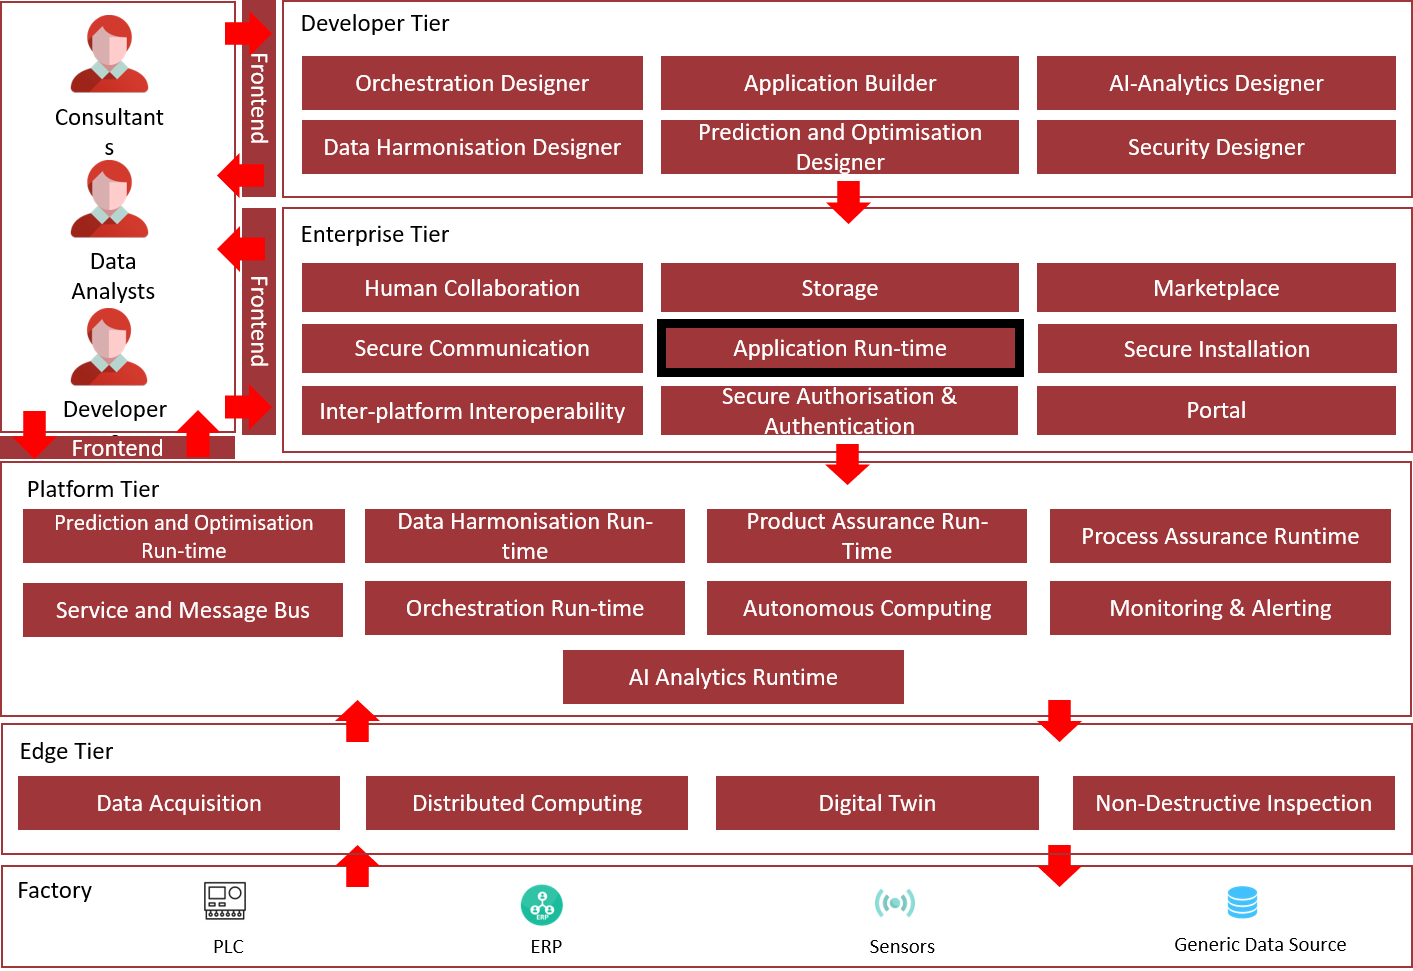
Figure 2: Position of Component in ZDMP Architecture
Benefits
Management and visibility of all components: One place to manage computing infrastructure and services
Extendable across cloud service: Allowing for versatile usage of cloud resources enabling computing to scale with a business
Cloud vendor agnostic: Allowing the choice of infrastructure provider, on-site, Amazon, Google, Microsoft, or alternative VPS (Virtual Private Server) providers
Scalability and versatility: Components and services can be scaled to meet user demands
Fully open source solution so no vendor locking: No tie-in to a single company with benefits from community driven software which is backed by businesses to reduce the integration problems of software deployment
Support: Critical infrastructure can be managed and supported by technical experts in the field
Features
This component offers the following features:
Application Management
API
Expose Services
Monitoring
Cluster Management
CI/CD
Application Management
The use of customize charts makes it easy to repeatedly deploy applications. All these different applications are bundled in Helm Charts. All the collection of applications in a Helm chart structure are called Catalogs and can be stored in a gitlab / github as a repository.
Helm Charts are collection of files that describe related Kubernetes resources. Such Helm Charts can deploy a simple application or something more complex like a full web app stack.
These Catalogs can be managed at different scopes. Global, Cluster or Project.
API
An API is provided that allows users to perform management operations using HTTP calls, for instance retrieve information about resources, perform actions such as deploying components, etc. This operations can also be performed via the UI.
In order to call the API, HTTP basic authentication is used by generating and including in the API call an API Key. This key may restict access at cluster or project level, and can have an expiration date typically day, month, year or custom for minutes or hours.
Filtering can be performed on most of the collections provided by using HTTP query parameters. The API UI shows the appropriate request. Some collections can be sorted by using common fields using HTTP query parameters: sort={sort name} and order={asc or desc}.
Expose Services
With the use of services, the use of internal ports helps with the communication of components internally and the use of NodePort or Ingress allows publishing UIs and APIs to the data gateway.
hostPort exposes the container to the external network at <hostIP>:<hostPort>, where the IP address of the Kubernetes Node is the hostIP where the container is running and the hostPort is the port requested by the component.
By default, Kubernetes services are accessible at the clusterIP wich is an internal IP address reachable from inside of the cluster only. To make it accessible from outside a NodePort service is required from a range 30000-32767. After the service is created, the kube-proxy that runs in all nodes, forwards all incoming traffic to the selected pods.
The Load Balancer can be used if a cloud provider is enabled in the configuration of the Kubernetes Cluster. It can provision a load balancer on AWS, Azure, CloudStack, GCE and OpenStack.
Ingress is deployed on the top of Kubernetes and it is a load balancer managed by Kubernetes. This forwards the traffic straight to the selected pods which is more efficient.
Kubernetes ingress has been the service type of choice to expose the ZDMP components to the internet.
To this end, a nginx reverse proxy is deployed in the same network than the Kubernetes cluster. That means nginx is internal to the network but not internal to the Kubernetes cluster, ie not deployed to the Kubernetes cluster.
nginx is configured with specific mapping rules that allow maping of a single URL to the multiple components deployed in the platform. This allows a reduction of management overhead there is no need to register new DNS names upon new component installation.
The nginx software listens to server name platform.zdmp.eu, then uses URI paths to select specific tenant and component. The server name is configurable via nginx configuration.
As an example, if access is needed to app1 in tenant1, the URL is: https://platform.zdmp.eu/tenant1/app1.
This address is transformed in nginx to an internal URL in the form of https://app1.tenant1.
Then this internal address is used as the host for the ingress resource.
The value for the tenant is zdmp in case of multi-tenant zApps, so if access is needed to the portal, the URL is https://platform.zdmp.eu/zdmp/portal.
Notice also that https is being used. Certificates are also provided for the external and the internal URLs. The external one at the nginx level will be CA signed and the internal ones are provided by the Secure Communication component.
Monitoring
Through the UI, administrators can examine all resources of a zApp; these include workloads containers, pods, services, volumes, ConfigMaps, resource usage etc. This information lets the administrator evaluate the zApp’s performance and identify the bottlenecks and remove them with the purpose of improve overall performance.
This configuration can be directly edited from within the UI, which gives an extra way to deploy quickly and then extract the correct YAML for inline or offline editing.
Logs can be accessible for every pod in the cluster to monitor any failures and it provides the option to download them for further support.
Cluster Management
With the use of Ansible scripts the deployment of a cluster can be performed with a few steps. Application runtime allows to centralize the management of different clusters whether these are on bare metal, public and private clouds such as EKS, GKE AKS. Switching between clusters and projects directly from the UI, facilitate cluster provisioning, upgrades, user management, and enforce security policies.
With the use of helm charts Catalogs, administrators can simultaneously install and upgrade zApps in multiple clusters and projects.
CI/CD
To use Continuous Deployment Jenkins Is used to deploy on Kubernetes environments. With a unique instance of CI/CD the structure of Helm charts can be checked to ensure ithey do not contain errors that can affect the Catalog. Also it validates yaml files and resources such as Persistent Volumes (PV), Ingress, cluster roles among others. Once the chart has been checked, it is installed on a temporary test environment to check health of the endpoints and then uninstalled. After a successful test, the chart is pushed to the Catalog where the CD will proceed to install it in Production.
System Requirements
Platform Infrastructure minimal requirements needed:
OS Ubuntu or Centos
RKE Kubernetes cluster for Applications formed by at least 2⁄10 machines, with at least the following specifications:
Master machine (1⁄3) with 2 CPU, 4GB RAM, and 100GB of disk
Worker machine (1⁄5) with 8 CPU, 16GB RAM, and 256GB of disk
K3s or RKE cluster for Rancher cluster:
Rancher (1⁄3): 8 CPU, 16 Gb RAM, and 256 Gb
Rancher v2.4.8
DNS Server if not provided:
- > DNS Server (1⁄2) with 2 CPU, 4GB RAM, and 50GB of disk
Software Requirements:
Docker
Docker-compose
Helm
RKE
K3s
Kubectl
Web Browser
Software Requirements for testing:
K3s
Helm
Kompose
Docker
Docker-compose
Web Browser
Rancher
Gitlab account
Associated ZDMP services
Required
T6.4 Services and Message Bus
T5.2 Secure Communication
T5.2 Secure Authentication
T5.2 Secure Installation
T6.2 MarketplaceT6.4 Portal
Optional
Installation Testing Environment
Requirements for testing environment. For further information check the documentation.
Docker
K3s distribution or Kubernetes cluster
Helm
Kompose
Docker-compose
Web Browser
Rancher
Docker
Installation:
# Uninstall old versions
        sudo apt-get remove docker docker-engine docker.io containerd runc

# Update the apt package index and install packages to allow apt to use a repository over HTTPS
        sudo apt-get update

# Install packages and dependencies
        sudo apt-get install apt-transport-https ca-certificates curl gnupg-agent software-properties-common

# Add Docker’s official GPG key:
        curl -fsSL https://download.docker.com/linux/ubuntu/gpg | sudo apt-key add -

# Verify that you now have the key with the fingerprint 9DC8 5822 9FC7 DD38 854A  E2D8 8D81 803C 0EBF CD88
        sudo apt-key fingerprint 0EBFCD88

# Set up the stable repository
        sudo add-apt-repository "deb [arch=amd64] https://download.docker.com/linux/ubuntu $(lsb_release -cs) stable"

# Install docker engine
        sudo apt-get update
        sudo apt-get install docker-ce docker-ce-cli containerd.io

# Docker as a non-root user
        sudo usermod -aG docker {USERNAME}
K3s distribution or Kubernetes cluster
Installation:
# Usage
        curl -sfL https://get.k3s.io | sh -s - --write-kubeconfig-mode 644 --node-ip {YOUR-IP} --node-external-ip {YOUR-IP} --docker

# Permissions
        sudo chmod 644 /etc/rancher/k3s/k3s.yaml
Helm
Installation:
# Download
        curl -fsSL -o get_helm.sh https://raw.githubusercontent.com/helm/helm/master/scripts/get-helm-3

# Permissions
        chmod 700 get_helm.sh

#Install
        ./get_helm.sh

# Environment
        export KUBECONFIG=/etc/rancher/k3s/k3s.yaml
Kompose
Installation:
# Download
        curl -L https://github.com/kubernetes/kompose/releases/download/v1.22.0/kompose-linux-amd64 -o kompose

# Permissions
        chmod +x kompose

# Move file
        sudo mv ./kompose /usr/local/bin/compose
Docker-compose
Installation:
# Install docker-compose
        sudo curl -L "https://github.com/docker/compose/releases/download/1.24.0/docker-compose-$(uname -s)-$(uname -m)" -o /usr/local/bin/docker-compose

# Permissions
        sudo chmod +x /usr/local/bin/docker-compose
Web Browser
Installation:
# Install firefox
        sudo apt-get install firefox -y
Rancher
Installation:
# Install certmanager
        kubectl apply --validate=false -f https://github.com/jetstack/cert-manager/releases/download/v0.15.0/cert-manager.crds.yaml

# Create namespace
kubectl create namespace cert-manager

# Add Repo
helm repo add jetstack https://charts.jetstack.io
helm repo update

# Install cert-manager
helm install cert-manager jetstack/cert-manager --namespace cert-manager --version v0.15.0

# Install Rancher
helm repo add rancher-stable https://releases.rancher.com/server-charts/stable

helm fetch rancher-stable/rancher --version=2.4.8

kubectl create namespace cattle-system

helm repo update

helm install rancher rancher-stable/rancher --version=2.4.8 --namespace cattle-system --set hostname=development.kubernetes

# Add HostName to the hosts file of your PC C:\Windows\System32\drivers\etc\hosts
192.168.10.10 development.kubernetes

# Set Credentials, URL, import cluster, patch deployments cattle-cluster-agent with rancher IP and Hostname.
Cluster Installation
To install a cluster for production use the documentation provided in this link.
Installation Overview:
Install Ansible
Create and distribute the ssh keys
Run the install-user.yaml playbook
Edit Host
Run the install-docker.yaml playbook
Run the install-k3s.yaml playbook
Run the install-rke.yaml playbook
Run the install-certmanagerk8s.yaml playbook
Run the install-rancherk8s.yaml playbook
How to use
This section shows how to use the Application Run-time Component for development testing, with the following sections:
From docker-compose to Application Run-time:
Convert docker-compose.yaml to helm charts and Kubernetes resources
Convert to helm charts
Configure Helm charts to use secrets
Test Helm charts
Expose Services
Clean up Helm charts
Helm Charts Structure
Dynamic Values
Test Helm Charts
Rancher Charts
Questions and zApp information
Upload charts to Repository
Inside Application Run-time:
API Application runtime:
Admin Global users
Organizations
Services
Add Catalog (Helm Charts location)
Installing an Application
For further information check the documentation.
Convert docker-compose.yaml to helm charts and Kubernetes resources
Convert to helm charts
# Run
        kompose convert -f docker-compose.yml -c --replicas=1

# Create Helm chart
  # Usage
helm create {APP-NAME}
# e.g.:
helm create zdmp-portal
Configure Helm charts to use secrets
# Generate Token to download ZDMP images.

# Copy registry-secret.yml in templates directory from ./resources/charts/templates/registry-secret.yml

# Edit label in registry-secret.yml with the name from _helpers.tpl. E.g.: “zdmp-portal.labesls”

# Add the following lines at the end of the _helpers.tpl file

{{- define "secret" }}
{{- printf "{\"auths\": {\"%s\": {\"auth\": \"%s\"}}}" .Values.privateRegistry.registryUrl (printf "%s:%s" .Values.privateRegistry.registryUser .Values.privateRegistry.registryPasswd | b64enc) | b64enc }}
{{- end }}

# Copy questions.yaml if it does not exist and amend with the information required by the app.

# Copy the following lines on deployments to replace imagePullSecrets, at the same level of containers. This line will inject the credentials in the deployment.

{{- if .Values.defaultSettings.registrySecret }}
    imagePullSecrets:
  - name: {{ .Values.defaultSettings.registrySecret }}
{{- end }}

# Add in values.yaml the following lines and change the SECRET-NAME with the name already provided in questions.

defaultSettings:  	registrySecret: "{ SECRET-NAME }"privateRegistry: registryUrl: zdmp-gitlab.ascora.eu:8443 registryUser: "" registryPasswd: ""

# Add namespace in all kubernetes files. At the same level of name.

metadata:
  namespace: {{ .Release.Namespace }}
  name: .....
Expose Services
# Expose application to host
# If expose to the host it can be use nodeport, otherwise install firefox and use the TCP port.
# NodePort: (default: 30000-32767)

# Add in services type: NodePort and nodePort: {NodePort-Number}

    spec:
      type: NodePort
      ports:
        - targetPort: 80
          port: 80
          nodePort: {NodePort-Number}
      selector:
          app: myapp
          type: front-end
```YAML
# Expose application via ingress

apiVersion: networking.k8s.io/v1beta1
kind: Ingress
metadata:
  name: {{ .Values.app.name }}-ingress
  namespace: {{ .Release.Namespace }}
  annotations:
    # use the shared ingress-nginx
    kubernetes.io/ingress.class: "nginx"
    nginx.ingress.kubernetes.io/proxy-body-size: 100m
spec:
  tls:
  - hosts:
    - {{ .Values.app.name }}.zdmp
    secretName: {{ .Values.app.name }}-tls
  rules:
  - host: {{ .Values.app.name }}.zdmp
    http:
      paths:
      - path: /
        backend:
          serviceName: {{ .Values.app.name }}
          servicePort: 8080
Clean up kubernetes yaml files
Delete metadata values not used in all files, for further information see documentation.
Helm Charts Structure
Dynamic Values
# Add values.yaml using this structure

    service1:
      image:
        repository: repository_location
        imagename: image_name
        tag: tag_version
        imagePullPolicy: IfNotPresent
      service:
        name: Name_of_Service1
        replicas: NumberOfReplicas
      config:
        server_port: "PORT_Number"
      ...

    service2:
      image:


# Change Variables in kubernetes files for { Values. }
# e.g.

    namespace: {{ .Release.Namespace }}

    replicas: {{ .Values.service1.service.replicas }}

    name: {{ .Values.service1.service.name }}-deployment

    image: "{{ .Values.service1.image.repository }}/{{ .Values.service1.image.imagename }}:{{ .Values.service1.image.tag }}"

    imagePullPolicy: {{ .Values.service1.image.imagePullPolicy }}

    - containerPort: {{ .Values.service1.config.server_port }}
Test Helm Charts
# Copy chart in the k3s environment
    helm template ./{APP-NAME}/{HELM-VERSION}/

# Install helm app
    helm install { Component-Name } {Version-Path} --namespace { Namespace } --set defaultSettings.registrySecret={ SECRET-NAME },privateRegistry.registryUrl={ REPOSITORY-URL},privateRegistry.registryUser={ REPOSITORY-USERNAME },privateRegistry.registryPasswd={ Token-Or-Password },{ Variable5 }={ Value5 },{ Variable6 }={ Value6 }

# Status
    helm status { Component-Name } -n { Namespace}
    kubectl get all,pv,pvc,secrets -n { Namespace}

# Uninstall helm chart
    helm uninstall { Component-Name } -n { Namespace}
Rancher Charts
Questions and zApp info.
Add rancher files:
app-readme.md: It provides descriptive text in the chart’s UI header
questions.yml: Form questions displayed within the Rancher UI. It simplify deployment of a chart, without it, it is necessary to configure the deployment using key value pairs
README.md: This text displays in Detailed Descriptions. It contains:
Description of the application
Prerequisites or requirements to run the chart
Descriptions of options in values.yaml and default values
Information that may be relevant to the installation or configuration of the chart
For further information see documentation.
Upload charts to Repository
Copy charts folder to the Application Runtime Gitlab repository
All the component Charts will be stored inside the chart folder.
# Status
git status
# Add files
git add .
# Commit message
git commit -m "Added Chart Component {Name} *****"
# Push Changes
git push
API Application runtime
Further information about the API can be found in this link.
Admin Gobal users
To use the application runtime by system administrators, the list of users of group need to be added in the application run-time in the global section. Users need to be added:
- Using the Web UI: Menu Global – Security – Add Users or Groups

- Using API: To add a user use the following API call on the terminal with access to the cluster configuration
# PUT
    https://{Application run-time URL}}/v3/keyCloakConfigs/keycloak
Organizations
To add a new organization a project needs to be created.
- Using the Web UI: Select Cluster – Projects/Namespaces – Add Project

- Using API: To add a Project use the following API call on the terminal with access to the cluster configuration.
# POST
    https://{Application run-time URL}}/v3/project?_replace=true
# POST
    https://{Application run-time URL}}/v3/projects/{clusterid}:{projectid}?action=setpodsecuritypolicytemplate
Services
Using the Application Runtime, users can install Apps using the UI in the project assigned to their organizations. A service NodePort is exposed per application backend and linked to the API gateway.
| Component | Protocol | Port |
|---|---|---|
| Rancher UI | TCP | 80 |
| NodePort | TCP/UDP | 30000-32767 |
| Rancher agent | TCP | 443 |
| SSH provisioning | TCP | 22 |
| Docker daemon TLS | TCP | 2376 |
| K8s API server | TCP | 6443 |
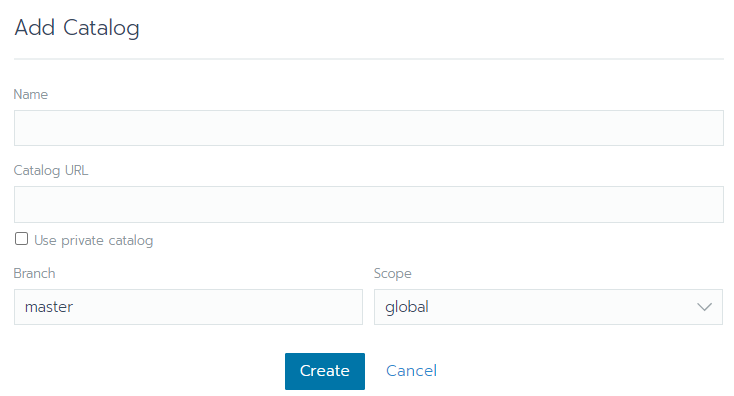
Add Catalog (Helm Charts) location
- Using the Web UI: After installation, the location of the helm charts needs to be imported from the menu Tools – Catalogs - Add Catalog
Name: Name of the catalog
Catalog URL: Repository location of the Helm chart.
- Using API: To add the repository use the following API call on the terminal with access to the cluster configuration.
# POST
    https://{Application run-time URL}}/v3/projectcatalog
Installing an Application
- Using the Web UI: The application can be installed from the UI using the menu APPS – Launch
Using API: To install a zApp use the following API call:
# POST
    https://{Application run-time URL}}/v3/projects/{clusterid}:{projectid}/app