Storage
General Description
This component represents an API gateway for ZDMP storage – aka files from general file systems (eg OS, Hadoop, FTP) and databases such as SQL or NoSQL. As a backbone solution Apache Knox was selected and in addition Apache Commons-VFS as a general library. The Apache Commons-VFS is used to develop special gateways based on ZDMP project needs.
| Resource | Location |
|---|---|
| Source Code | Link |
| Latest Release | V1.0.4 |
| X Open API Spec | Link |
| Video | Link |
| Further Guidance | None |
| Related Datasets | None |
| Additional Links | None |
| Generation date of this content | 12 May 2021 |
Screenshots
The following images are illustrative screen shots of the component.
Component Author(s)
| Company Name | ZDMP Acronym | Website | Logo |
|---|---|---|---|
| Software Imagination & Vision | SIMAVI | www.simavi.ro |  |
Commercial Information
| Resource | Location |
|---|---|
| IPR Link | Storage |
| Price | [For determination at end of project] |
| Licence | [For determination at end of project] |
| Privacy Policy | [For determination at end of project] |
| Volume license | [For determination at end of project] |
Architecture Diagram
The following diagram shows the position of this component in the ZDMP architecture.
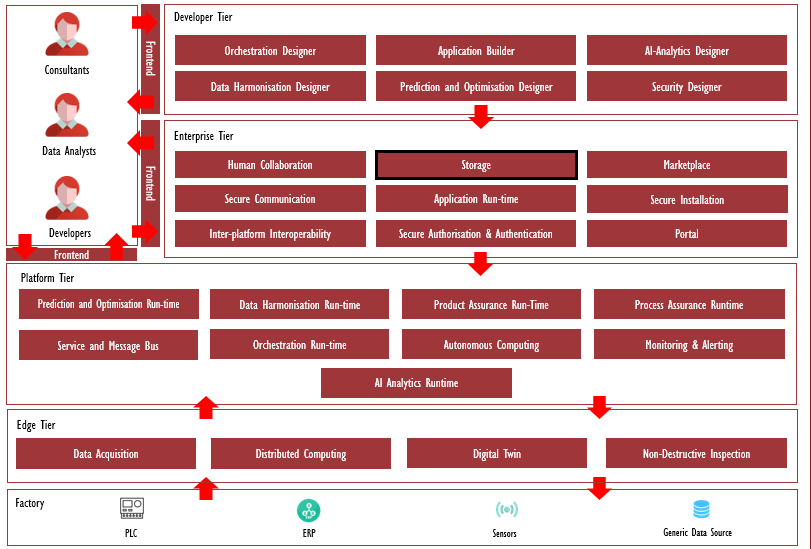
Figure 1: Position of Storage Component in ZDMP Architecture
Benefits
The benefits are:
Other ZDMP components can access SQL databases, NoSQL databases, file system directly or using API
Users and ZApps developers can use a dedicated API for accessing/creating/deleting files from ZDMP common file systems
For the other ZDMP components, Storage will provide connection strings for direct access to SQL databases and NoSQL databases
Features
The features for this component are itemised below and explained thereafter:
Access files from file systems using provided API
Access SQL databases directly
Access NoSQL databases directly
Access SQL and NoSQL databases using API
Access files from file systems using provided API
Users and ZApps developers can use a dedicated API for accessing/creating/deleting files from ZDMP common file systems.
Access SQL databases directly
For the other ZDMP components, the Storage provides connection strings for direct access to SQL databases.
Access NoSQL databases directly
For the other ZDMP components, the Storage provides connection strings for direct access to NoSQL databases.
Access SQL and NoSQL databases using API
Users and ZApps developers can use dedicated API for accessing and using ZDMP common databases both SQL and NoSQL variants.
System Requirements
Minimal requirements needed:
Virtual machine’s cluster formed by at least 2 machines with 2VPC, 4GB RAM and 40GB of disk which will manage the worker nodes of Portainer.
Docker version 19 minimum.
Associated ZDMP services
Required
Installation
The ZDMP Storage component can be installed using docker files.
To run this component, it is used following steps:
docker run --rm -ti zdmp/knox-docker:1.4.0Figure 2: Create docker container for Knox (Bash)
Create ZDMP network in Docker:
```bash
docker network create zdmp
Figure 3: Create docker network (Bash)
Create container for Hadoop-standalone
```bash
docker run --net zdmp -d --name=hadoop-standalone -p 8088:8088 -p 50070:50070 \
-p 14000:14000 athlinks/hadoop && docker logs -f hadoop-standalone
Figure 4: Create docker container for Hadoop (Bash)
Clone the Knox project from GitLab:
```bash
git clone https://github.com/pfisterer/apache-knox-docker.git
cd apache-knox-docker
Figure 5: Create Knox project (Bash)
Replace in Dockerfile, line 26, with sed on linux:
```bash
sed -i "26i RUN sed -i 's/localhost:50070/hadoop-standalone.zdmp:50070/g' \
/opt/knox/conf/topologies/sandbox.xml" Dockerfile
Figure 6: Modify Dockerfile (Bash)
Create the Knox image:
```bash
docker build --tag knox .
Figure 7: Create Knox image (Bash)
Create the Knox container
```bash
docker run --net zdmp --name=knox -p 8443:8443 -p 33389:33389  -ti knox
Figure 8: Create Knox container (Bash)
Open the Knox administrative user interface
```bash
https://localhost:8443/gateway/manager/admin-ui/
Figure 9: URL for Knox (Bash)
Running pods in k8s:
```bash
git clone -b vilce https://zdmp-gitlab.ascora.eu/zdmp_code/enterprise-tier/t6.2-storage.git

cd t6.2-storage/orchestration/docker-compose/templates

kubectl apply -f
Figure 10: Create pods in K8s (Bash)
Database installation in storage
PostgreSQL database
Create PostgreSQL database in a Docker container:

```bash
docker container run -d -p 5432:5432 --name pg-example \
-v /data/postgresql:/var/lib/postgresql/data \
-e POSTGRES_DB=virtualacademypsdb \
-e POSTGRES_PASSWORD=0123456789 postgres
Figure 11: Install PostgreSQL in Docker (Bash)
This command uses environment variables for database name initialization and password. For every component, a separate database will be created (in this example this database was created for the HCE Virtual Academy component).
- MySQL database
Create MySQL database in a Docker container:
docker container run -p 3306:3306 --name mysql-example \
-v /data/mysql:/var/lib/mysql \
-e MYSQL_ROOT_PASSWORD=0123456789 -d mysql
Figure 12: Install MySQL in Docker (Bash)
This command uses environment variables for database name initialization and password. For every component, a separate database (schema) will be created and many users (as many as needed).
- MongoDB database
Create MongoDB database in a Docker container:
docker container run --name mongodb-example \
-v /data/mongodb:/data/db \
-d -p 27017:27017 mongo
Figure 13: Install MongoDB in Docker (Bash)
For every component, a separate database will be created.
Running databases on k8s:
```bash
cd t6.2-storage/orchestration/db/docker-compose/templates
kubectl apply -f.
Figure 14: Install databases in K8s (Bash)
Install PostgreSQL database and PostgREST API using docker-compose file:
version: '3'
services:
  server:
    image: postgrest/postgrest
    ports:
      - "3000:3000"
    links:
      - db:db
    environment:
      PGRST_DB_URI: postgres://postgres:0123456789@db:5432/postgres
      PGRST_DB_SCHEMA: api
      PGRST_DB_ANON_ROLE: web_anon #In production this role should not be the same as the one used for the connection
    depends_on:
      - db
  db:
    image: postgres
    ports:
      - "5432:5432"
    environment:
      POSTGRES_DB: postgres
      POSTGRES_USER: web_anon
      POSTGRES_PASSWORD: 0123456789
    volumes:
      - /data/postgREST:/var/lib/postgresql/data
  swagger:
    image: swaggerapi/swagger-ui
    ports:
      - "8080:8080"
    expose:
      - "8080"
    environment:
      API_URL: http://localhost:3000/
Figure 15: Docker compose file for PostgREST (YAML)
Setup test – create schema and test tables:
postgres=# create schema api;
CREATE SCHEMA
postgres=# create table api.mspc_variables (id serial primary key, code text not null, description text not null, um text not null, minval double precision, maxval double precision);
CREATE TABLE

postgres=# create table api.mspc_measurements(id serial primary key, varid bigint, val double precision, time timestamptz);
CREATE TABLE
Figure 16: Create schema and tables in PosgreSQL (Bash)
Create role and grant the rights:
postgres=# create role web_anon nologin;
CREATE ROLE
postgres=# grant usage on schema api to web_anon;
GRANT
postgres=# grant select on api.todos to web_anon;
GRANT
postgres=# create role authenticator noinherit login password 'mysecretpassword';
CREATE ROLE
postgres=# grant web_anon to authenticator;
GRANT ROLE
postgres=#  grant all on api.mspc_variables to web_anon;
GRANT
postgres=# grant all on api.mspc_variables_id_seq to web_anon;
Figure 17: Create roles and grants in PosgreSQL (Bash)
Insert some rows in the PostgreSQL table to test the SELECT methods:
postgres=# insert into api.mspc_variables (code, description, um) values ('VAR_A', 'Rotation', 'rot/min'), ('VAR_B', 'Vibration', 'm/s2');
INSERT 0 2
postgres=# insert into api.mspc_measurements (varid, val, time) values (1, 4500, now());
INSERT 0 1
postgres=# insert into api.mspc_measurements (varid, val, time) values (1, 4665, now());
INSERT 0 1
postgres=# insert into api.mspc_measurements (varid, val, time) values (1, 4687, now());
INSERT 0 1
postgres=# insert into api.mspc_measurements (varid, val, time) values (1, 4699, now());
INSERT 0 1
postgres=# insert into api.mspc_measurements (varid, val, time) values (2, 10.55487, now());
INSERT 0 1
postgres=# insert into api.mspc_measurements (varid, val, time) values (2, 6.55221, now());
INSERT 0 1
postgres=# insert into api.mspc_measurements (varid, val, time) values (2, 0.558874, now());
INSERT 0 1
postgres=# insert into api.mspc_measurements (varid, val, time) values (2, -3.558874, now());
INSERT 0 1
postgres=# insert into api.mspc_measurements (varid, val, time) values (2, -15.225547, now());
INSERT 0 1
Figure 18: Insert rows in PosgreSQL (Bash)
How to use
Note that due to the nature of this component, there is no UI foreseen at this stage. In the next part, there are mentioned “curl” example commands regarding how to use the Storage API.
Clean-up directory /user/user/example:
curl -i -k -u user:user-password -X DELETE \'https://localhost:8443/gateway/sandbox/webfs/user/user/example?op=DELETE&recursive=true'Figure 19: Clean-up directory (Bash)
Register the name for a sample file README in /user/user/example:
curl -i -k -u user:user-password -X PUT'https://localhost:8443/gateway/sandbox/webhdfs/user/user/example/README?op=CREATE'Figure 20: Register name for sample file (Bash)
Upload README to /user/user/example:
curl -i -k -u user:user-password -T README -X PUT \'https://localhost:8443/gateway/sandbox/webhdfs/user/user/example/README?op=CREATE'Figure 21: Upload README (Bash)
List the contents of the directory /user/user/example:
curl -i -k -u user:user-password -X GET \ 'https://localhost:8443/gateway/sandbox/webhdfs/user/user/example?op=LISTSTATUS'Figure 22: List contents of directory (Bash)
Request the content of the README file in /user/user/example:
curl -i -k -u user:user-password -X GET \ 'https://localhost:8443/gateway/sandbox/webhdfs/user/user/example/README?op=OPEN'Figure 23: Request content of file (Bash)
Read the content of the file:
curl -i -k -u user:user-password -X GET \ 'https://localhost:8443/gateway/sandbox/webhdfs/user/user/example/README?op=OPEN'Figure 24: Read content of file (Bash)
Get the list of available tables:
Set Accept Header to “text/plain”, “text/xml”, “application/json” or “application/x-protobuf”:
curl -ik -u guest:guest-password\Figure 25: Get list of available tables
Create table with two column families using xml input:
curl -ik -u guest:guest-password\
 -H "Accept: text/xml"   -H "Content-Type: text/xml"\
 -d '<?xml version="1.0" encoding="UTF-8"?><TableSchema name="table1"><ColumnSchema name="family1"/><ColumnSchema name="family2"/></TableSchema>'\
 -X PUT 'https://localhost:8443/gateway/sandbox/hbase/table1/schema'
Figure 26: Create table example using XML (Bash)
Create table with two column families using JSON input:
curl -ik -u guest:guest-password\
 -H "Accept: application/json"  -H "Content-Type: application/json"\
 -d '{"name":"table2","ColumnSchema":[{"name":"family3"},{"name":"family4"}]}'\
 -X PUT 'https://localhost:8443/gateway/sandbox/hbase/table2/schema'
Figure 27: Create table example using JSON (Bash)
Get table metadata:
curl -ik -u guest:guest-password\
 -H "Accept: text/xml"\
 -X GET 'https://localhost:8443/gateway/sandbox/hbase/table1/regions'
Figure 28: Get Table metadata (Bash)
Insert single row table:
curl -ik -u guest:guest-password\
 -H "Content-Type: text/xml"\
 -H "Accept: text/xml"\
 -d '<?xml version="1.0" encoding="UTF-8" standalone="yes"?><CellSet><Row key="cm93MQ=="><Cell column="ZmFtaWx5MTpjb2wx" >dGVzdA==</Cell></Row></CellSet>'\
 -X POST 'https://localhost:8443/gateway/sandbox/hbase/table1/row1'
Figure 29: Insert single row table (Bash)
Insert multiple rows into table:
curl -ik -u guest:guest-password\
 -H "Content-Type: text/xml"\
 -H "Accept: text/xml"\
 -d '<?xml version="1.0" encoding="UTF-8" standalone="yes"?><CellSet><Row key="cm93MA=="><Cell column=" ZmFtaWx5Mzpjb2x1bW4x" >dGVzdA==</Cell></Row><Row key="cm93MQ=="><Cell column=" ZmFtaWx5NDpjb2x1bW4x" >dGVzdA==</Cell></Row></CellSet>'\
 -X POST 'https://localhost:8443/gateway/sandbox/hbase/table2/false-row-key'
Figure 30: Insert multiple rows into table (Bash)
Get all data from table:
Set Accept Header to “text/plain”, “text/xml”, “application/json” or “application/x-protobuf”:
curl -ik -u guest:guest-password\
 -H "Accept: text/xml"\
 -X GET 'https://localhost:8443/gateway/sandbox/hbase/table1/*'
Figure 31: Get all data from Table (Bash)
Execute cell or row query:
Set Accept Header to “text/plain”, “text/xml”, “application/json” or “application/x-protobuf”:
curl -ik -u guest:guest-password\
 -H "Accept: text/xml"\
 -X GET 'https://localhost:8443/gateway/sandbox/hbase/table1/row1/family1:col1'
Figure 32: Execute cell or row query (Bash)
Delete entire row from table:
curl -ik -u guest:guest-password\
 -H "Accept: text/xml"\
 -X DELETE 'https://localhost:8443/gateway/sandbox/hbase/table2/row0'
Figure 33: Delete row from table (Bash)
Delete column family from row:
curl -ik -u guest:guest-password\
 -H "Accept: text/xml"\
 -X DELETE 'https://localhost:8443/gateway/sandbox/hbase/table2/row0/family3'
Figure 34: Delete column family from row (Bash)
Delete specific column from row:
curl -i -k -u user:user-password -X DELETE \'https://localhost:8443/gateway/sandbox/webfs/user/user/example?op=DELETE&recursive=true'
curl -ik -u guest:guest-password\
 -H "Accept: text/xml"\
-x Delete ‘ht
Figure 35: Delete specific column from row (Bash)
Access databases from storage
PostgreSQL
The component should access the database using the following attributes:
Hostname (eg 192.168.100.2)
Port (eg 5432)
Database name (eg virtualacademypsdb)
Password (the same as defined in the docker command)
Username (eg postgres)
From a console using the psql client the database can be accessed like in example:
psql -h 192.168.100.2 -d virtualacademypsdb -U postgres -p 5432Figure 36: Connect to PostgreSQL (Bash)
In k8s, PostgreSQL port running on k8s is 30191/TCP
Data is stored on NFS server in /nfsdata/postgres
MySQL
The component should access the database using some attributes:
Hostname (eg 192.168.100.2)
Port (eg 3306)
Database name eg virtualacademy)
Password (the same as defined in the docker command)
Username (eg root)
From a console using the mysqlsh client the database can be accessed like in example:
$ mysqlsh mysql://root@192.168.100.2:3306/virtualacademyFigure 37: Connect to MySQL (Bash)
In k8s, MySQL port running on k8s is 30192/TCP.
Data is stored on NFS server in /nfsdata/mysql.
MongoDB
The component should access the database using some attributes:
Hostname (eg 192.168.100.2)
Port (eg 27017)
Database name (eg virtualacademy)
From a console using the mongosh client the database can be accessed like in example:
$ mongosh "mongodb://192.168.100.2:27017/virtualacademy"Figure 38: Connect to MongoDB (Bash)
In k8s, MongoDB port running is 30190/TCP.
Data is stored on NFS server in /nfsdata/mongo.
PostgREST API
Test GET methods – SELECT statement:
$ curl http://192.168.100.2:3000/mspc_variables

[{"id":1,"code":"VAR_A","description":"Rotation","um":"rot/min","minval":null,"maxval":null},
 {"id":2,"code":"VAR_B","description":"Vibration","um":"m/s2","minval":null,"maxval":null}]
Figure 39: PostgREST GET method (Bash)
All the operators used in the WHERE clause are documented here: https://postgrest.org/en/v7.0.0/api.html
Test POST methods – INSERT statement:
$ curl http://192.168.100.2:3000/mspc_variables -X POST -H "Content-Type: application/json" -d '{"code": "VAR_C", "description": "Temperature", "um":"K"}'Figure 40: PostgREST POST method (Bash)
Verify inserted row:
```bash
$ curl http://192.168.100.2:3000/mspc_measurements?varid=eq.1

[{"id":1,"varid":1,"val":4500,"time":"2021-02-11T18:30:57.096096+00:00"},
 {"id":2,"varid":1,"val":4665,"time":"2021-02-11T18:31:06.627168+00:00"},
 {"id":3,"varid":1,"val":4687,"time":"2021-02-11T18:31:13.122566+00:00"},
 {"id":4,"varid":1,"val":4699,"time":"2021-02-11T18:31:18.911947+00:00"}]
Figure 41: Verify inserted row in PostgREST (Bash)
Test PATCH methods – UPDATE statement:
$ curl http://192.168.100.2:3000/mspc_variables?id=eq.1 -X PATCH -H "Content-Type: application/json" -d '{"minval": "0", "maxval": "19000"}'Figure 42: PostgREST PATCH method (Bash)
Verify updated row:
```bash
$ curl http://192.168.100.2:3000/mspc_variables?id=eq.1

[{"id":1,"code":"VAR_A","description":"Rotation","um":"rot/min","minval":0,"maxval":19000}]
Figure 43: Verify updated row in PostgREST (Bash)
Test DELETE methods – DELETE statement:
```bash
$ curl http://192.168.100.2:3000/todos
Figure 44: DELETE method in PostgREST (Bash)
Verify the deleted row:
```bash
$ curl http://192.168.100.2:3000/todos?id=eq.1 -X DELETE

[{"id":3,"done":false,"task":"install in docker","due":null},
 {"id":6,"done":false,"task":"install api from docker-compose","due":null},
 {"id":7,"done":false,"task":"write the documentation","due":null},
 {"id":8,"done":false,"task":"commit in gitlab","due":null},
 {"id":4,"done":true,"task":"test in docker","due":null}]
Figure 45: Verify deleted row in PostgREST (Bash)