Prediction and Optimisation Designer
General Description
The Prediction and Optimisation Designer (PO Designer) is a ZDMP component that supports the development of new process quality solutions based on Python. The PO Designer facilitates the discovery of open-source resources that can be helpful for data scientist developing new algorithms and models for process quality, as well as to find challenges published by manufacturing users that need innovative solutions to detect, correct, or prevent process quality defects. The PO designer facilitates the discovery of these resources through a search engine which is based on taxonomies specifically defined to support the definition of zero defects manufacturing solutions. Data scientists can browse available resources and easily import them into a Git project which is automatically generated in the Human Collaboration hub. These development projects implement CI/CD pipelines to build and deploy their models in the AI Analytics Runtime component. Moreover, data scientists do not need to worry on any of the particularities of ZDMP to develop a new model. Their Python scripts only need to implement functions to instantiate and run their model that use Panda’s data-frames[1] (a de-facto standard for data manipulation in Python) as parameters. The generated Git project will provide the necessary code to deploy their code in the runtime. The main concepts introduced in the PO Designer are:
Layer: A layer represents the implementation of specific zero-defect manufacturing algorithms or machine learning models that solve a specific process quality problem (eg detection, prediction, optimisation, simulation). Layers are implemented as Python modules which contain a compute unit class with methods to instantiate and run the specific algorithm. A layer may import other layers or other Python modules and libraries. For example, a layer could be a Mixed-Integer Programming solution based on revised simplex for production sequencing, or a Long Short-Term Memory (LSTM) machine learning model to predict sensor time series
Dataset: Provides data to instantiate a specific problem in the zero defects manufacturing domain. Datasets are basically tabular data. Thus, a dataset is a collection of data columns that may be organised in different entities. Data scientists can use datasets in their development projects to evaluate and validate the effectiveness of their algorithms to solve a specific zero defects manufacturing problem. For instance, a dataset may contain sensor data time series, or a historic of production orders
Development project: Development projects are Git projects in the Human Collaboration hub aimed at the creation of new PO runtime components. Development projects generated by the PO Designer provide off-the-shelf all the required files to deploy and run an algorithm as a PO Runtime component. Development projects are the main artefacts of the PO Designer, they all have the same project structure, and may contain one or more resources (layers or datasets). For instance, a development project for machine parameter tuning can integrate a neural network layer and use a time series dataset for evaluation and validation
| Resource | Location |
|---|---|
| Source Code | Link |
| Latest Release (v1.0.0) | Download |
| X Open API Spec | Link |
| Video | Link |
| Further Guidance |
|
| Related Datasets |
|
| Additional Links |
|
| Generation date of this content | 10 June 2021 |
Figure 1: Summary of information related to the PO Designer
Screenshots
Component Authors(s)
| Company Name | ZDMP Acronym | Website | Logo |
|---|---|---|---|
| Universidad Politècnica de València | UPV | https://cigip.webs.upv.es |  |
Commercial Information
| Resource | Location |
|---|---|
| IPR Link | C2NET Optimization |
| Price | [For determination at end of project] |
| Licence | [For determination at end of project] |
| Privacy Policy | [For determination at end of project] |
| Volume license | [For determination at end of project] |
Architecture Diagram
The following diagram shows the position of this component in the ZDMP architecture.
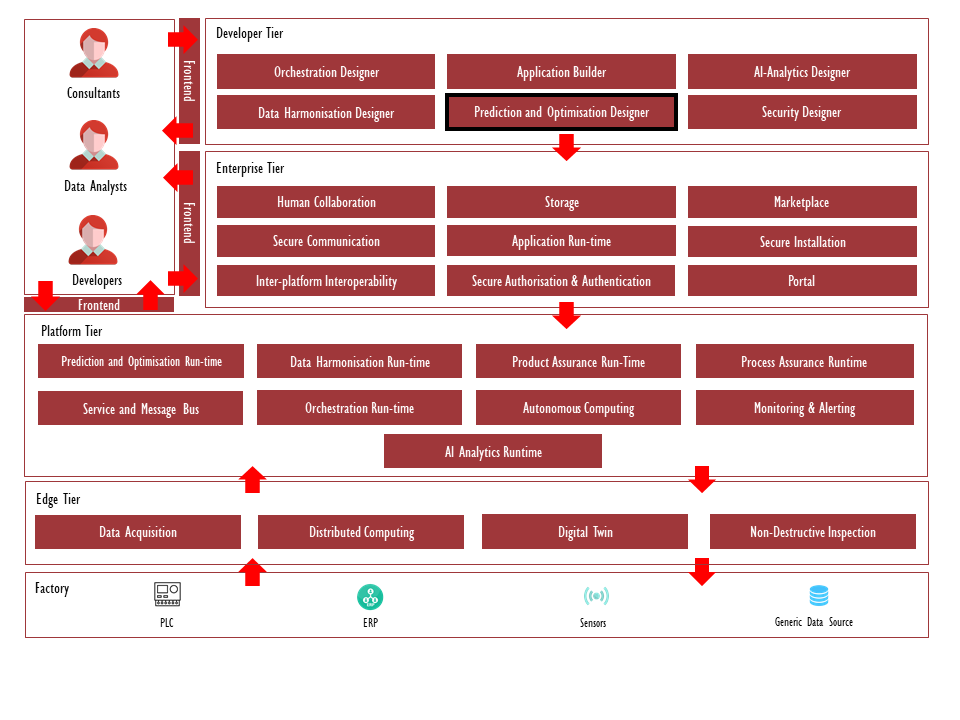
Figure 2: Position of Component in ZDMP Architecture
Benefits
Open-source modules that can be used to develop new runtime components (simulation, prediction, detection, or optimisation) for process quality assurance
Datasets that can be used to test and validate algorithms for a specific process quality problem
Easily create a new development project with all the Continuous Integration / Continuous Development (CI/CD) needed to deploy and run an algorithm as a runtime component
Share open-source projects with the ZDMP developer community
Challenge the ZDMP developer community to solve a process quality problem
Features
The features to achieve the functionality of this component are itemised below and explained there after:
Find available resources (open-source layers and datasets)
Develop Prediction and Optimisation Projects
Manage Layers and Datasets of an organisation
Share resources with the ZDMP developer community
Find Prediction and Optimisation Projects
Users can browse and filter available resources using different criteria based on a zero-defect manufacturing taxonomy. Users need only to introduce the search criteria and the Designer will show all the development resources that match the search criteria. This way, developers have different options to create a new development project. For instance, they can create a new development project “from scratch”. The Designer provides a skeleton that implements all the functionalities common to any Process Quality Run-time component together with CI/CD pipelines and additional files to build and run algorithms as ZDMP components. Furthermore, all process quality components have the same interfaces with other ZDMP components, they all provide the same API to other ZDMP components and connect to the same endpoints. The Designer creates a project scaffold that implements all these common functionalities, with placeholders to implement the specific requirements of the development project.
Alternatively, developers can browse the resources (models and/or datasets) available and add them to their development project. The Designer, in this case, will generate the source code of a process quality component enhanced with additional functionalities implemented in the selected development resources, like datasets to validate solutions for specific problems or layers that implement specific models and techniques (eg a neural network) known to solve a particular process quality problem.
The Prediction and Optimisation Designer search engine is supported by the Zero-Defect Manufacturing (ZDM) taxonomy. The ZDM Taxonomy is a hierarchy of concepts used to classify zero-defect manufacturing models and datasets addressing product and process quality management techniques.
The main objectives of the taxonomy are:
Define the ZDMP coverage on quality management activities according to quality management standards
Provide a unified approach where datasets and algorithms for process and product quality initiatives can be found and queried
ZD Taxonomy of four sub-taxonomies:
ZDM Taxonomy AO: Taxonomy to classify areas and business objectives that models are expected to address
ZDM Taxonomy DP: Core taxonomy of the ZDM taxonomy. It specifies process and product quality domains and problems
ZDM Taxonomy TA: Taxonomy specific for classifying models according to their type and algorithm
ZDM Taxonomy TD: Taxonomy specific for datasets, specifying the type and entities covered by them
All layers and datasets are classified into these sub-taxonomies, and the search engine of the PO Designer allows users to explore the available solution based on this information.
Develop Prediction and Optimisation Projects
Prediction and Optimisation models and datasets are the building blocks of Prediction and Optimisation Projects. Developers can add new datasets and layers through the Designer so that they can be used by other developers within their organisation or shared with the community.
Models and datasets should follow a set of specifications to be indexed as a resource, so that they can be reused by other developers. Specifically, layers must contain the files and folders in the section below. The generated projects already comply with all the requirements so that data scientists need only to worry about their code, but in case of a need to make any changes to the standard file structure of the generated project, make sure to verify the requirements in the sections below.
Manifest file (manifest.json)
Project must contain an AI Analytics runtime manifest file complying with the specifications for Docker Layers. The manifest file must specify the module name of the Python module that implements the methods to instantiate and run the layer. The following code snippet provides an example of a valid manifest file:
{
 "name": "component_name",
 "description": "This is the description of your layer name. Below you can add some tags e.g. to find your components in runtime",
 "tags": [
  "simulator",
  "machine"
 ],
 "version": "1.0",
 "input": {
  "runtime": [
   {
    "type": "REST_API"
   }
  ]
 },
 "output": {},
 "modelData": {
  "type": "DOCKER_LAYERS",
  "payload": {
   "envVars": {
    "OPTIONAL_ENV_VAR":"True",
   },
   "layers": [{
    "name": "layer_name"
   }]
  }
 }
}
Dockerfile
Project needs to include a Dockerfile to build the image of a layer from the base PO Runtime image. Thus, the Dockerfile must contain a FROM instruction to use this base image, which implements the REST API that other components can use to instantiate and run the layer, as well as the clients to the data services used to fetch data in runtime. Normally, the Dockerfile must only:
Use the base PO runtime image
Copy and install the Python modules and libraries used by the layer
Set the working directory to /usr/local/app
The AI runtime component will add the environment variables defined in relevant manifest.json to the Dockerfile. The following is an example of a valid Dockerfile:
FROM zdmp-GitLab.ascora.eu:8443/zdmp_code/platform-tier/t7.1-t7.2-t7.3-prediction-and-optimization-run-time/backend:1.2
# Set up working directory
WORKDIR /usr/local/app/layers
ENV LAYER_MODULE_NAME=layer_name
### INSERT HERE ENV VARS FROM MANIFEST ###
# {{ }}
# Copy files
COPY requirements.txt .
COPY electrospindle_simulation_problem ./electrospindle_simulation_problem
#Install requirements
RUN pip install --no-cache-dir -r requirements.txt
RUN pip install ./sample_module/
WORKDIR /usr/local/app
Layer files
Project needs to include the different files that are copied to the layer through the Docker file. For instance, in the example above, the project must include:
requirements.txt: A text file with the dependencies of the code to be installed using pip install
sample_module: A folder with the Python module that implements the Compute_unit class that runs relevant model or algorithm. The module must contain a module named layer_name, which implements the (compute_unit) methods to instantiate and run the model
The code snippet below describes in detail the files included in the example. Besides the Dockerfile and manifest.json files, the layer includes the requirements.txt file with external libraries that are installed with PiP[2] in the Dockerfile above. Finally, the example contains the directory additional package with the necessary files to create a Python package[3] with the layer_name module.
->Dockerfile
->manifest.json
->requirements.txt
->sample_module
 |->LICENSE
 |->README.md
 |->setup.py
 |->layer_name
   |->__init__.py
   |->_metadata.json
   |->compute_unit.py
   |->metadata.py
The layer must contain a script to define the ComputeUnit class. In the example above, this is implemented in the compute_unit.py file:
```python
import pandas as pd
import json

  '''
  The ComputUnit object represents a model or algorithm.
  Args:

  Attributes:

  '''


class ComputeUnit:
  def __init__(self):
    # TODO: add your initialisation code here
   pass

  def compute(self, inputs_collection, module_params_collection):
    '''The compute method is used to compute your model or algorithm

    Args:
      inputs_collection (frame): Pandas dataframe with the input data to run your model
      module_params_collection (frame): module_params_collection to create


    Returns:
      output (dict): dictionary with the ouput result(s) of your model. The keys in the
      dictionary correspond to the names of the outputs of your model. The values must be
      Pandas dataframes
    '''
    # TODO: add the code of your model here or in functions or other classes.

    # 1. Read your inputs and params
    # inputs, params and outputs are pandas dataframes so you need to transform them in whatever format you want to use
    # in this example we transform a dataframe with just a row into a dictionary and read it
    self.inputs = inputs_collection.T.to_dict()[0]
    self.params = module_params_collection.T.to_dict()[0]

    # 2. Do the computation
    self.result = (self.inputs['input1']+self.inputs['input2'])*self.params['param1']

    # 3. Transform your output to a dataframe and return it
    resultdf = pd.DataFrame([self.result], columns=['output1'])

    return {"outputs_collection": resultdf}
Basically, data scientists need only to make sure that the compute_unit method outputs the results of the algorithm as a Pandas dataframe. The Docker integration layer will take of all the complexities of the integration with other ZDMP components, and the deployment in the ZDMP runtime.
Manage new Models and Datasets
Finally, the PO Designer provides convenient user interfaces to access resources (models and datasets) managed by an organisation in their project repository in the Human Collaboration GitLab. The PO Designer allows to list, to check the details of models, and datasets, as well as to access the projects directly from the PO Designer UI.
System Requirements
To deploy the component using Docker compose, it is required to have Docker installed. To deploy the component using the available Helmcharts, it is required to have Kubernetes and Helm installed. Thus, the minimal requirements needed are:
Associated ZDMP services
Required
Optional
Installation
Code Structure
The PO Designer is composed of two subcomponents: Frontend subcomponent (a ReactJS web application offering the PO Designer interface), and a backend subcomponent (which is a web application that implements the search engine, and the integration with the Human Collaboration component).
The PO Designer tree structure is as follows:
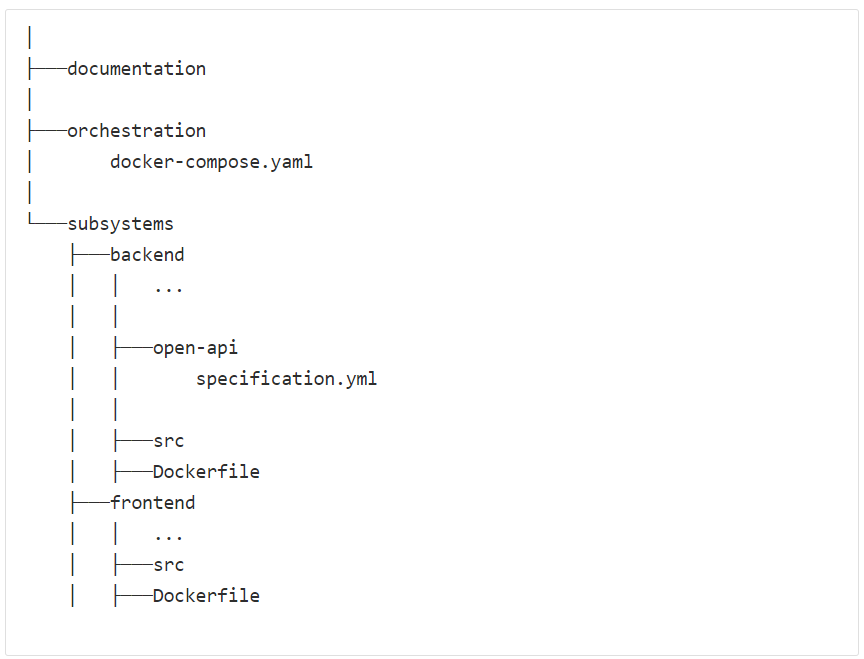
Figure 3: PO Designer code structure
The main folders in the development project file structure are:
Documentation: This folder contains a set of .md files describing the PO Designer. It contains this deployment documentation, along with the PO Designer User Guide explaining how to use the PO Designer for developing ZDM solutions
Orchestration: This folder contains a set of Docker-compose .yaml files to deploy the subcomponents locally. These .yaml files are used primarily for development and testing. The folder also contains the Helmcharts to deploy the component in the Application Runtime component
Subsystems: This folder contains different folders with each of the subcomponents of the PO Designer. The main subcomponents are:
Backend: Contains the source code of the PO Designer Backend. Developed in Flask, the backend subcomponent implements the REST API (specified by the open-api/specification.yml file) used by the PO Designer frontend. It provides endpoints to filter development resources using the ZDMP taxonomy, to generate development projects. It also implements the PO Designer generator, which generates the project source code for new development projects
Frontend: Contains the source code of the user interface, a web application that interacts with the backend using the backend REST API
Running with Docker Compose
The provided Docker-compose .yaml files can be used to run the component locally. Note that if this is the case, there is a need to run other required components listed in section in the same Docker host to avoid issues.
To use the provided Docker-compose, from the root folder of the code run the following command:
Docker-compose -f .\orchestration\Docker-compose.yaml up --build --remove-orphansThe command will build the images and run the services specified in the different Docker files.
Running with Helm
As any other ZDMP component, the PO Designer has Helmcharts that can be used to deploy the component using Helm. To deploy the designer, select the folder of the version to be deployed and use the install command to install it in a cluster. The following command installs the archive containing version 1.0.4 of the PO Designer as po_designer:
helm install po_designer .\v1.0.4\RDF Store Persistence Configuration
The PO Designer uses a Resource Description Framework (RDF) store to support the search engine. To improve performance, the quadstore can be persisted into storage, although it is also possible to load into memory in case that the user wants to avoid the deployment of the required volumes. The persistence of the RDF store is controlled through configuration properties defined in the backend/src/config.json file:
Onto_source: This parameter controls whether the taxonomies are loaded into the optimized RDF quadstore or into memory. If it is equal to “Onto_rdf_store_path”, this file loads the taxonomies from the persisted RDF store if exists, otherwise it loads the taxonomies from the root Ontology Language (OWL) file into a newly created RDF store. If the value is “Onto_owl_path”, then it loads the taxonomies from the root OWL file into memory. The default value is “Onto_rdf_store_path”
Onto_reset_file: This parameter controls the creation of the RDF quadstore. If set to “Always”, it will reload the RDF quadstore every time the backend service is restarted, even if it exists. If set to “If_Not_Present”, the RDF quadstore is only created if it is not already present in the persistence volume. The default value is “If_Not_Present”
Find below the default onto config.json object as a reference. The remaining parameters must not be changed:
{
 "DomainProblem_iri": "R989vQYxCXXLA4iEkyogRgM",
 "AreaObjective_iri": "ZDMTaxonomyAO",
 "TypeAlgorithm_iri": "ZDMTaxonomyS",
 "TypeDataset_iri": "RCOHbCRMUsTeB6AfeC0hqzH",
 "IndividualDescription_iri": "RCN3XbYeiJIDq08pvIe0ycZ",
 "IndividualUrl_iri": "R82dRCFTE14Vnv4jbbxQ5SH",
 "ClassRelatedTo_iri": "R9WVSA4782Ierlhtk6NfBme",
 "IndividualLayer_iri": "RDj7tFRYODhNmNOzIF9nv3a",
 "Onto_owl_path": "src/data/taxonomy.owl",
 "Onto_sqllite_path": "src/data/taxonomy.sqlite3",
 "Onto_source": "Onto_rdf_store_path",
 "Onto_reset_file": "If_Not_Present"
}
How to use
The PO Designer primarily objective is to support developers in the development of new layers for zero defects manufacturing applications. The development process is managed in the Human Collaboration component, articulated through Git development projects. The Human Collaboration component provides the Git code repository services. The PO Designer facilitates the creation of Git development projects for new layers, using available templates and allowing to import into the project open-source layers. The project templates provide the necessary CI/CD pipelines to build and deploy the newly created layers in the Prediction and Optimisation Run-time (PO Run-Time) component.
Users need to login to access the functionalities of the PO Component. Before logging in, the application menu is just empty:
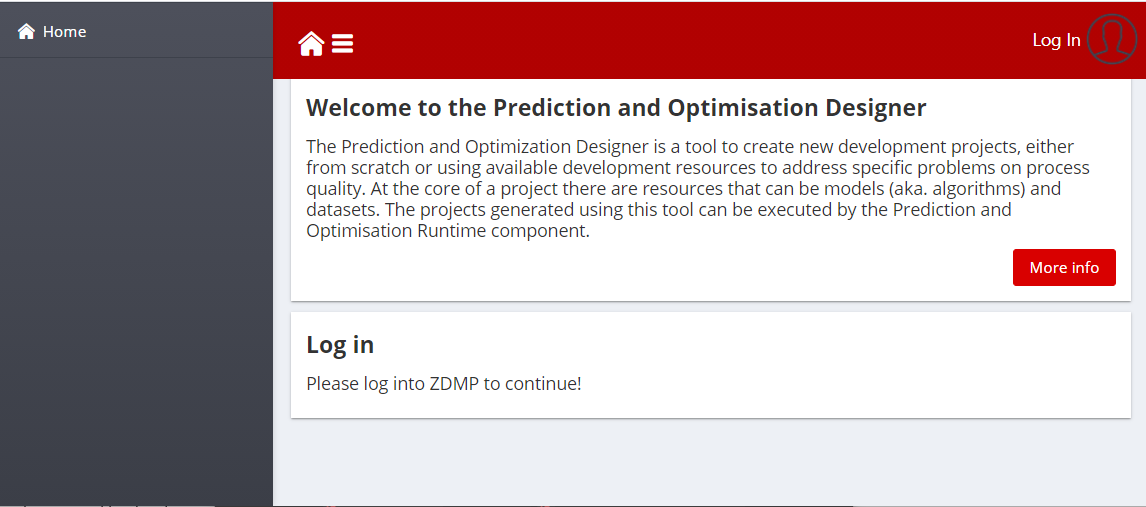
Figure 4: PO Designer Menu Bar and landing before login
Once logged in with relevant ZDMP credentials, the menu bar and the landing page will use the different functionalities of the PO Designer:
Home: Access to the landing page that shows the different functionalities available: Create a project, view the projects of an organisation in the po-layers group, register a new resource or view the resources of an organisation
Create Project: This page allows to create a new development project for a Docker layer, as described in the Section 1.11.1 Create a new Project
View your projects: This page allows users to see and manage the development projects for PO layers of the organisation. It is described in the Section Manage your Projects
Register Resource: This page allows users to index new open-source resource so that it is available for other developers Register a Resource
My Resources: This page lists the resources of an organisation. The details of this page can be found in section Manage your Resources
Settings: This page allows organisation to manage the configuration settings of the component. Section Settings contains the configuration settings available for developers
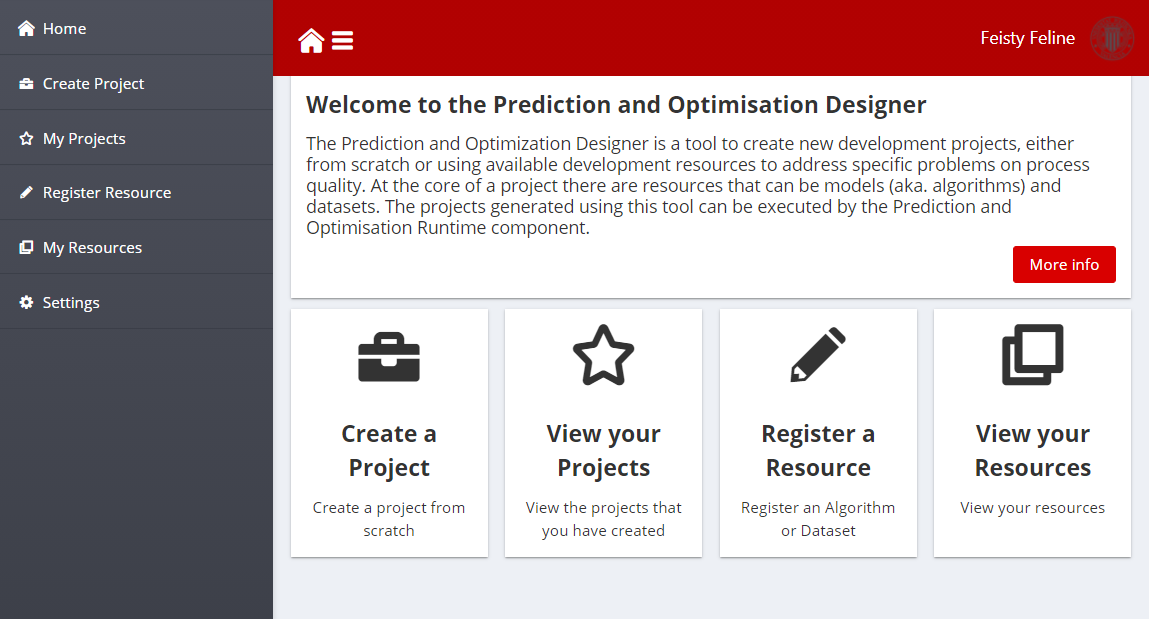
Figure 5: PO Designer Menu Bar and landing before login
Create a new Project
When creating new development projects, the main options in the main toolbar section of the page are:
Create an Empty PO Project: This option is used by developers who want to create a new solution from scratch providing their datasets and algorithms
Create PO Project from Resources: This option is for developers who want to customise existing development projects, adapting the layers and dataset for their specific needs
Create PO Project for a Challenge: This option allows developers to develop new layers based on existing datasets that will use to validate their solutions
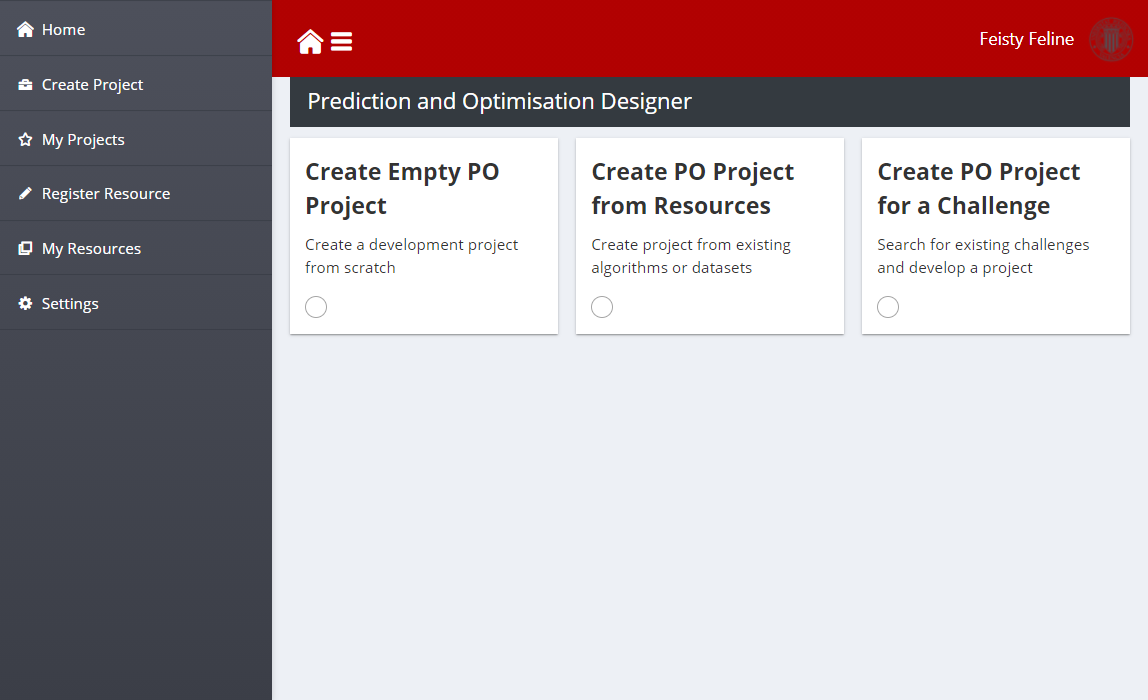
Figure 6: PO Designer Toolbar for Project Generation
Selecting one of those options will provide specific wizards to create a development project.
Create an Empty Project
This option is intended for developers that want to develop, build, and deploy in the AI and Analytics runtime a new layer “from scratch”. The generator will create a Git project that includes the CI/CD pipelines to build and deploy the layer, as well as template files with the file structure described in section Develop Prediction and Optimisation Projects, so that developers can easily develop a new layer.
The developer needs only to fill in two text fields to create a new project:
Name: Name of the ZDM development project
Description: Extended description of the development project
After clicking Create, the PO Designer will create a new development project according to the template project structure as stated above. The resulting code can be edited by the developers using the Integrated Development Environment (IDE) of their choice.
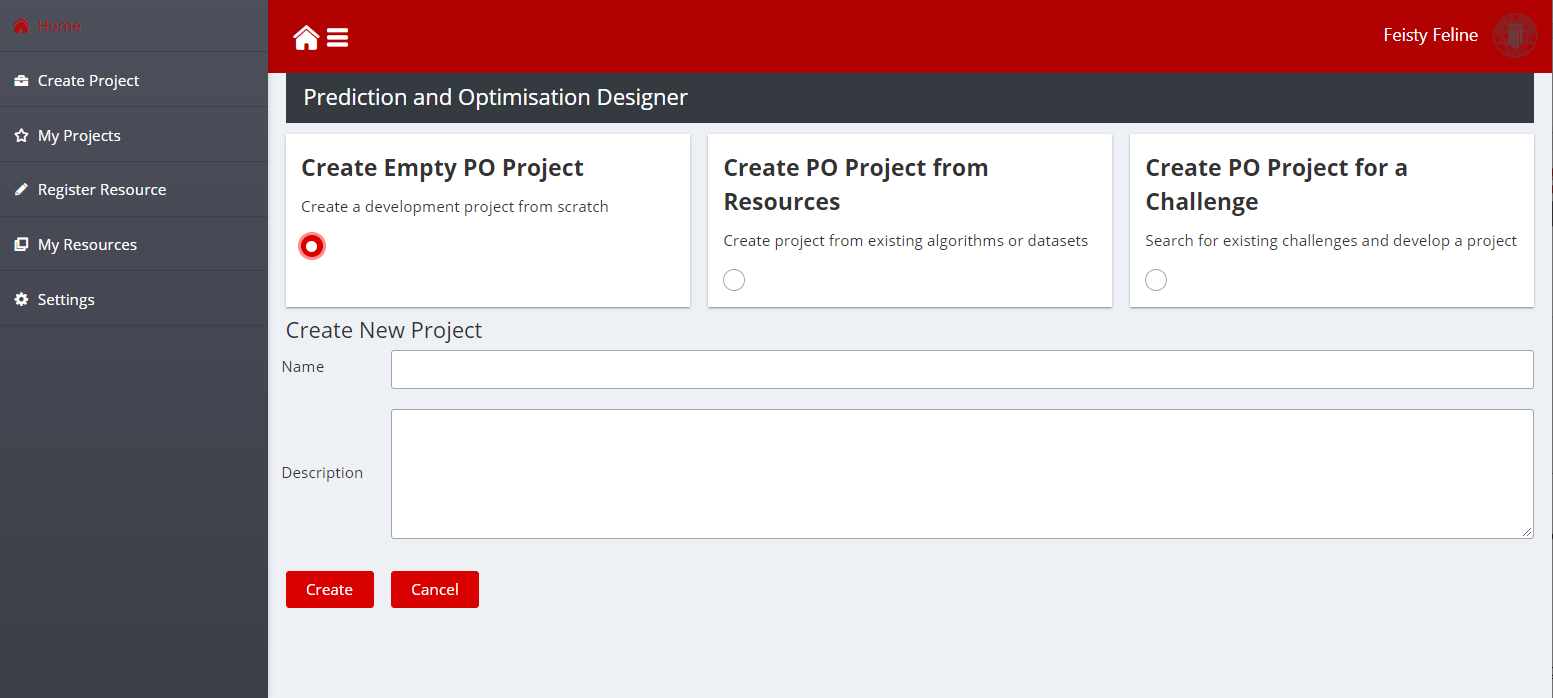
Figure 7: Create Empty Project Screenshot
When a name and the description is filled, click on the Create button, the PO Designer will show a confirmation dialog providing a link to the newly created Git project:
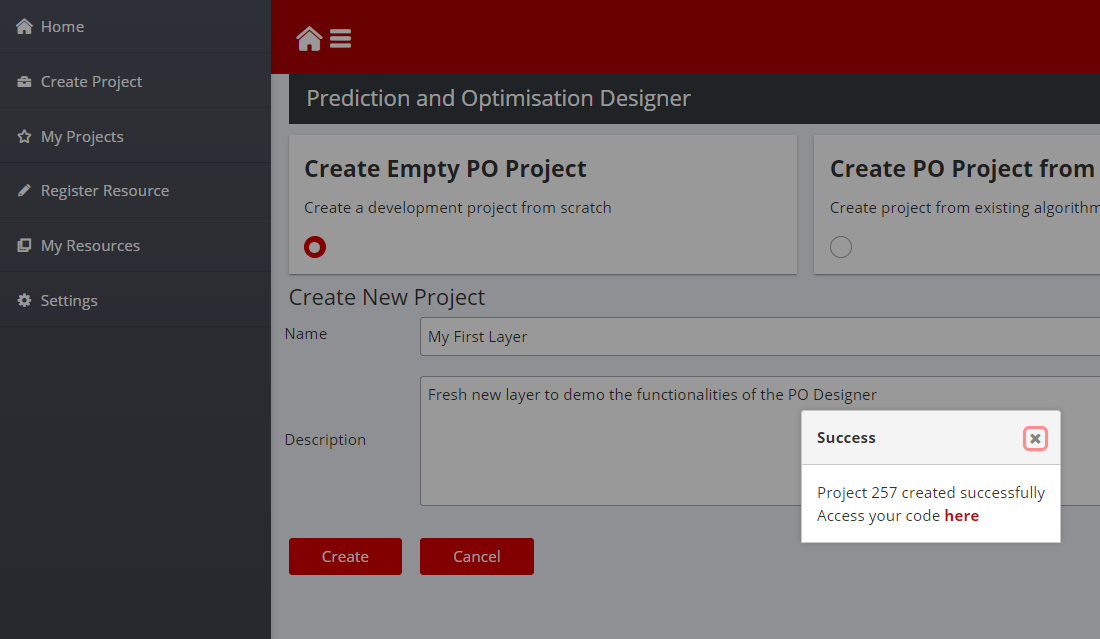
Figure 8: Create Empty Project Screenshot
If link is clicked during the import, a warning message may be found when the link is clicked. When the process is completed, a file structure described above can be found and the layer with the libraries choose can be worked on. For instance, Python and Tensor flow modules to develop a neural network for processing machine conditioning data, and a CSV dataset on machine information and final product inspection data to train the previous neural network model. After finishing their implementation, developers can use the provided CI/CD pipelines to build and deploy the layer.
Create Project from Resources
The Create Project from Resources functionality provides developers the possibility to copy existing open-source resources into their projects to customise, adapt, or extend existing layers. ZDMP provides a repository of development resources (open-source layers and datasets) which can be browsed, analysed, and downloaded so that other developers can use, customise, and extend them.
One example is a developer that browses existing solutions on process start-up parameters tuning in search of a solution that they can adapt, or datasets that they can use to validate the implementation.
The workflow for creating projects from existing solutions is:
Enter the search keywords in the search box. Enter keywords to search solutions related to the search
Click on the search button (magnifier icon) to find solutions, keywords should appear as tokens in the search input text field as in the screenshot below:
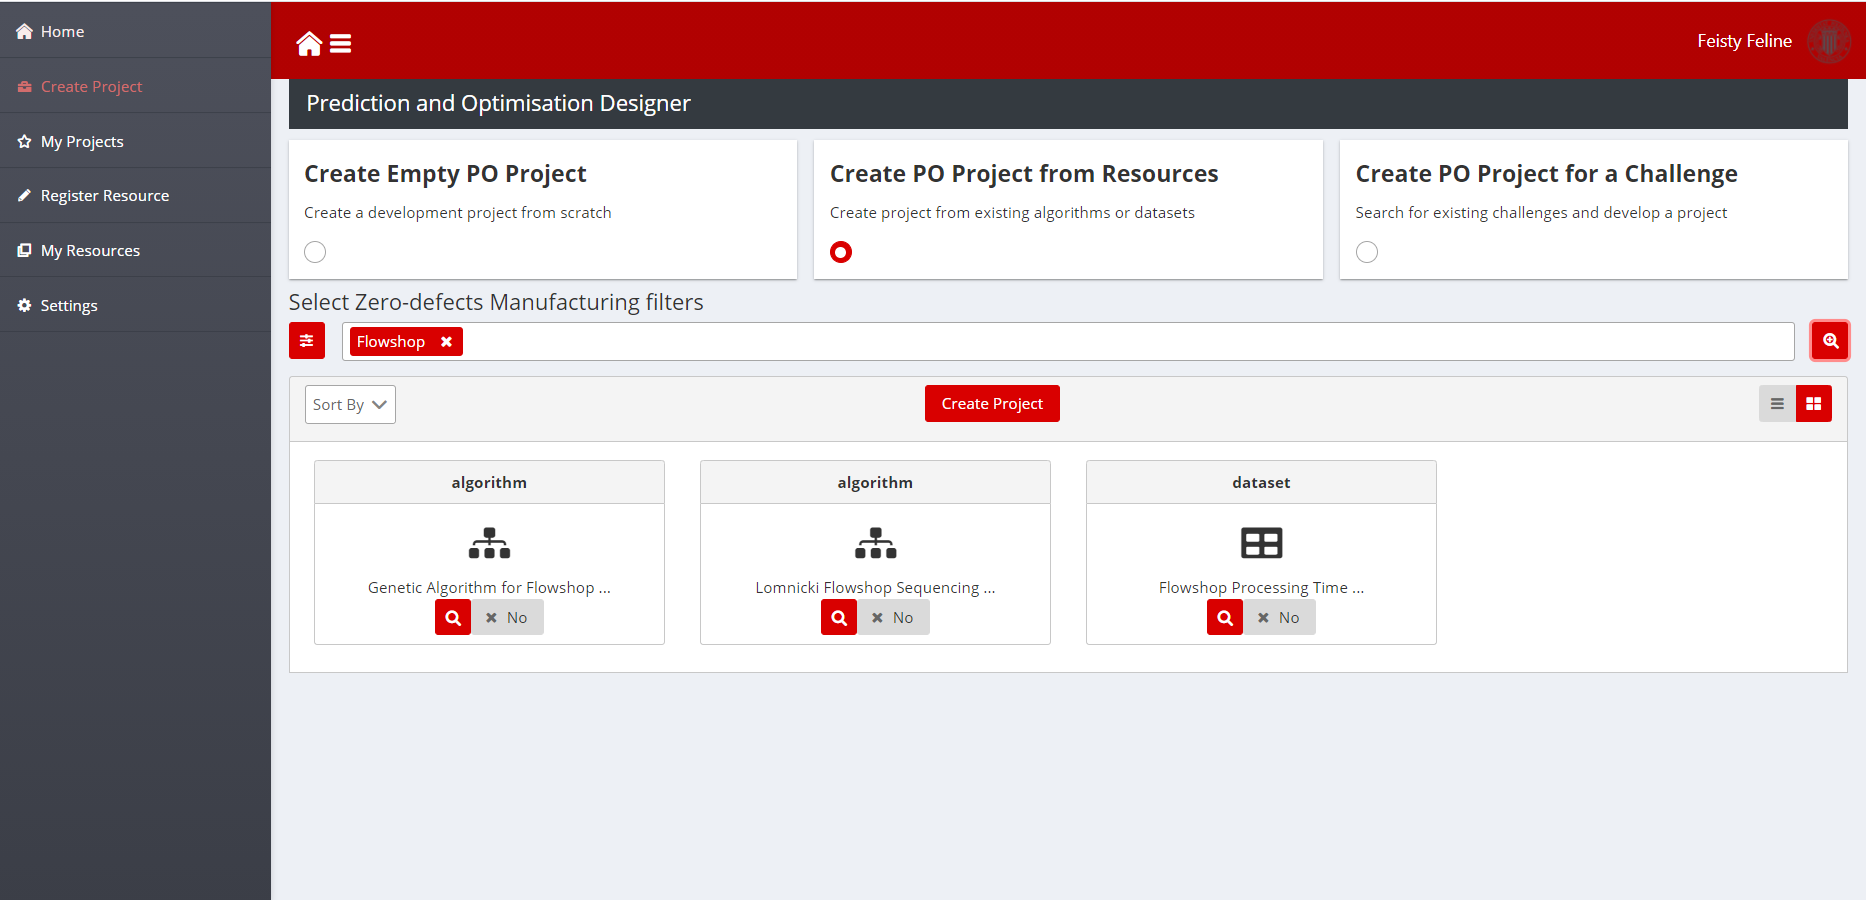
Figure 9: Applying filters
- Alternatively, apply filters. There are filters available for the problem domain of the existing solution, the objective, the type of model or algorithm or the data used for input or output. These categories have been specifically designed for zero defects manufacturing
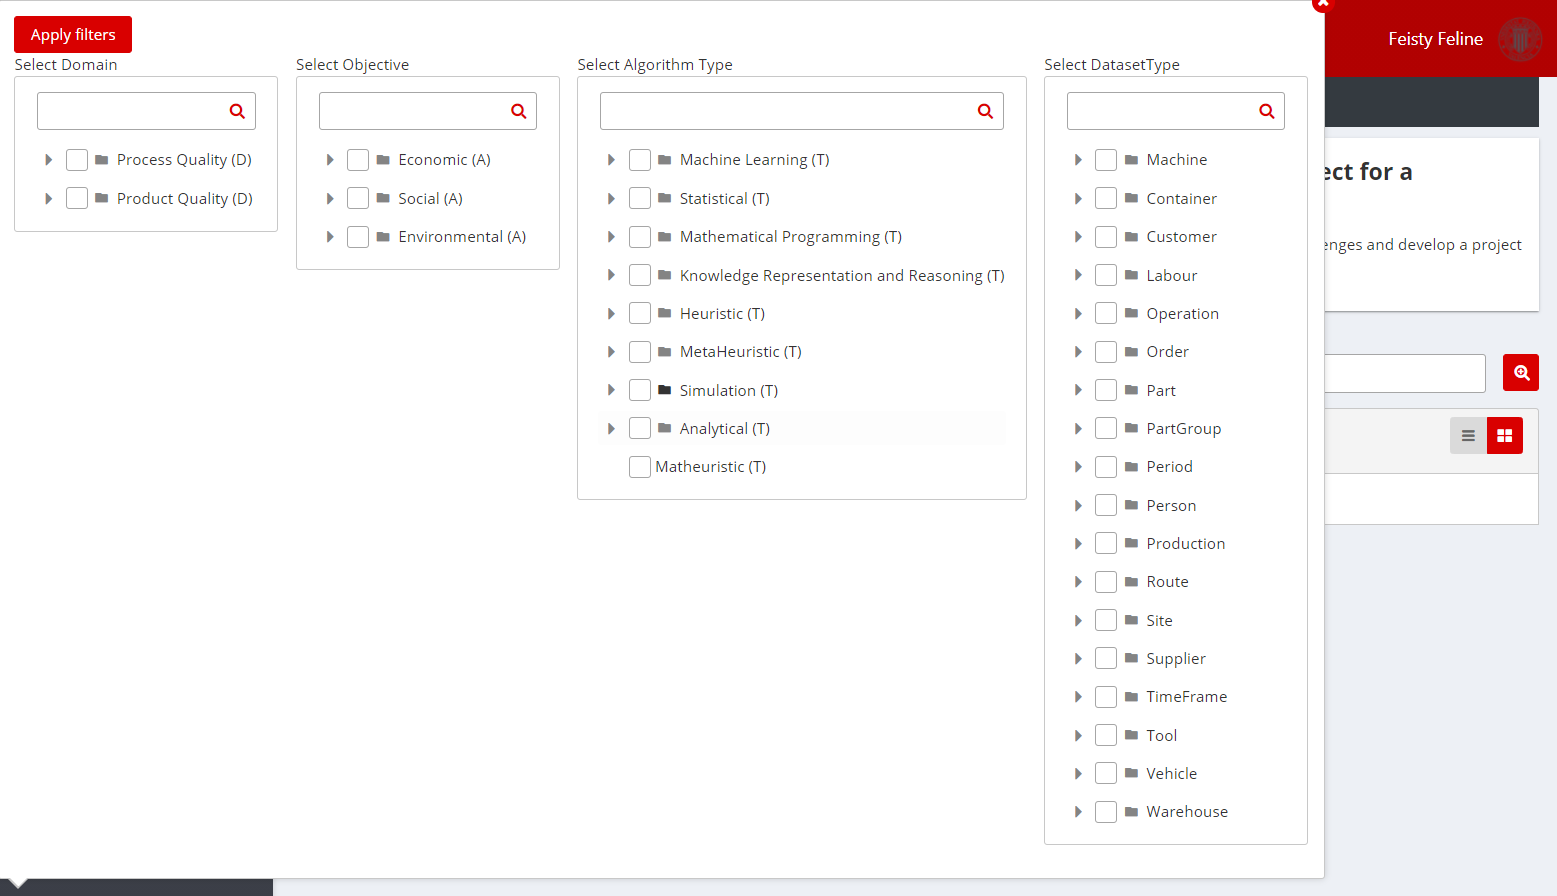
Figure 10: Model Filtering Screenshot
- After selecting the filters, the selected filtering criteria should appear as tokens in the search bar. Again, clicking on the search button (magnifier icon) will provide a list of results
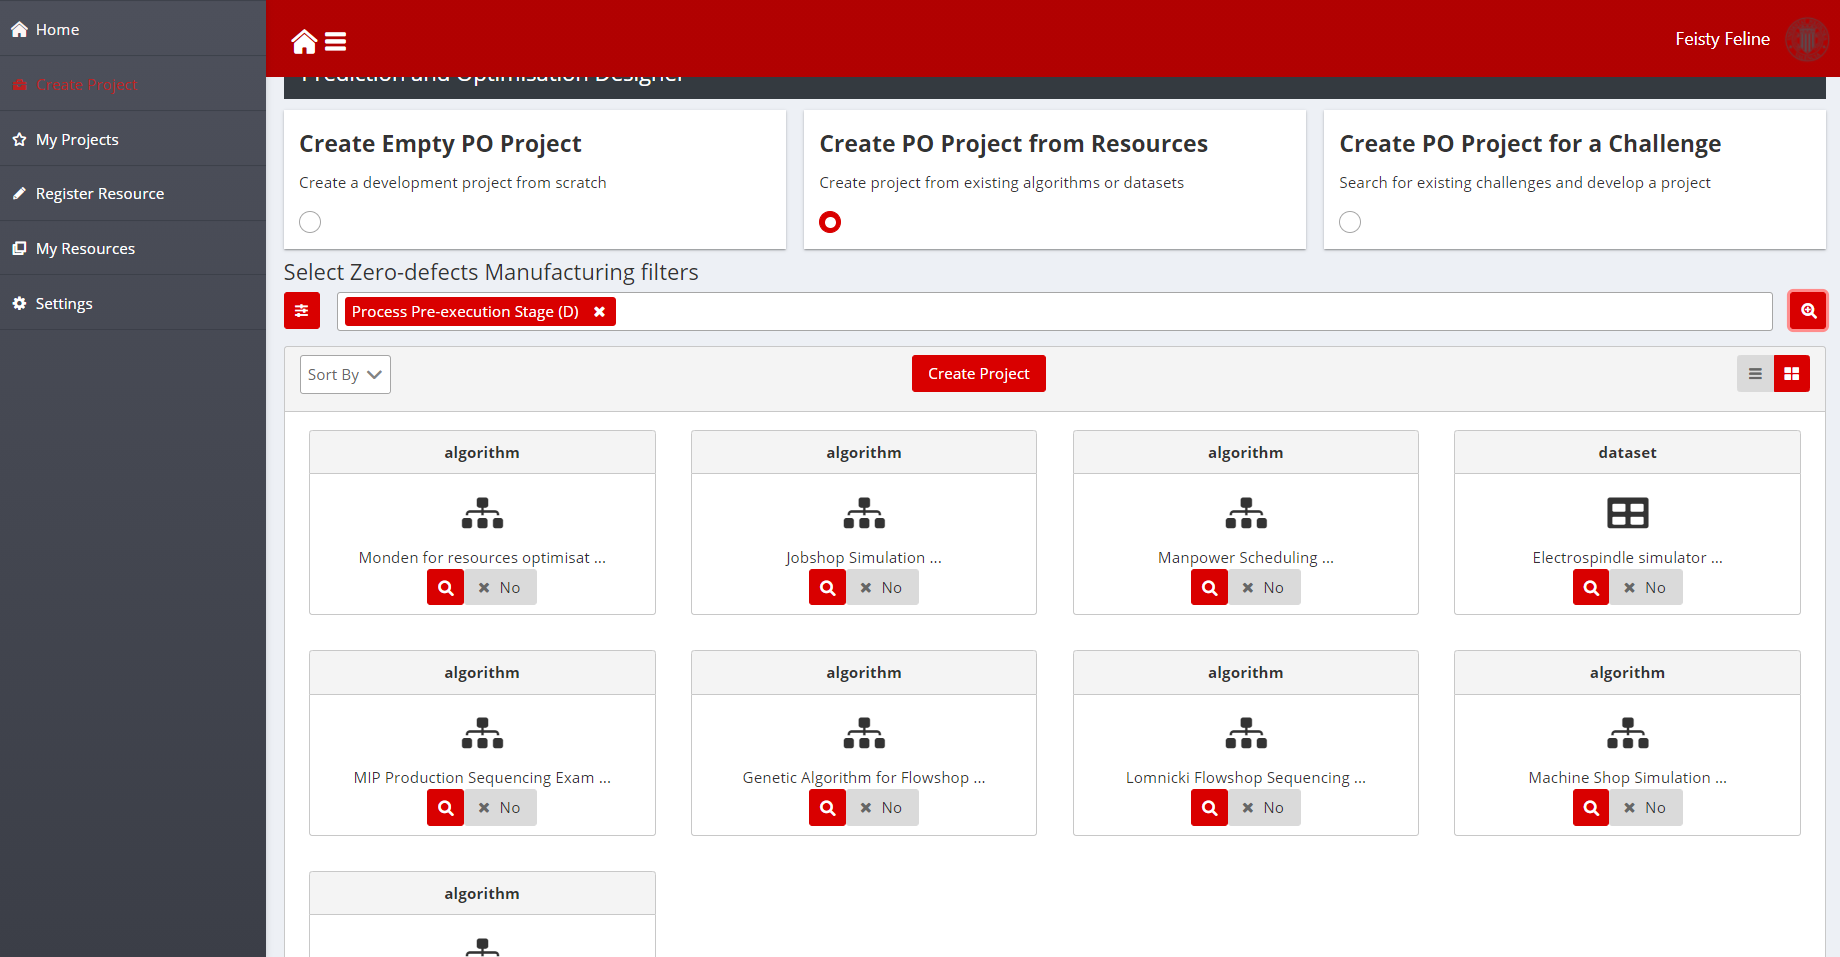
Figure 11: Model Querying Screenshot
- Additional information about the resource is obtained when clicking the details button (magnifier icon on each of the projects returned). The README file included in the open-source project is available at the end of the detailed description:
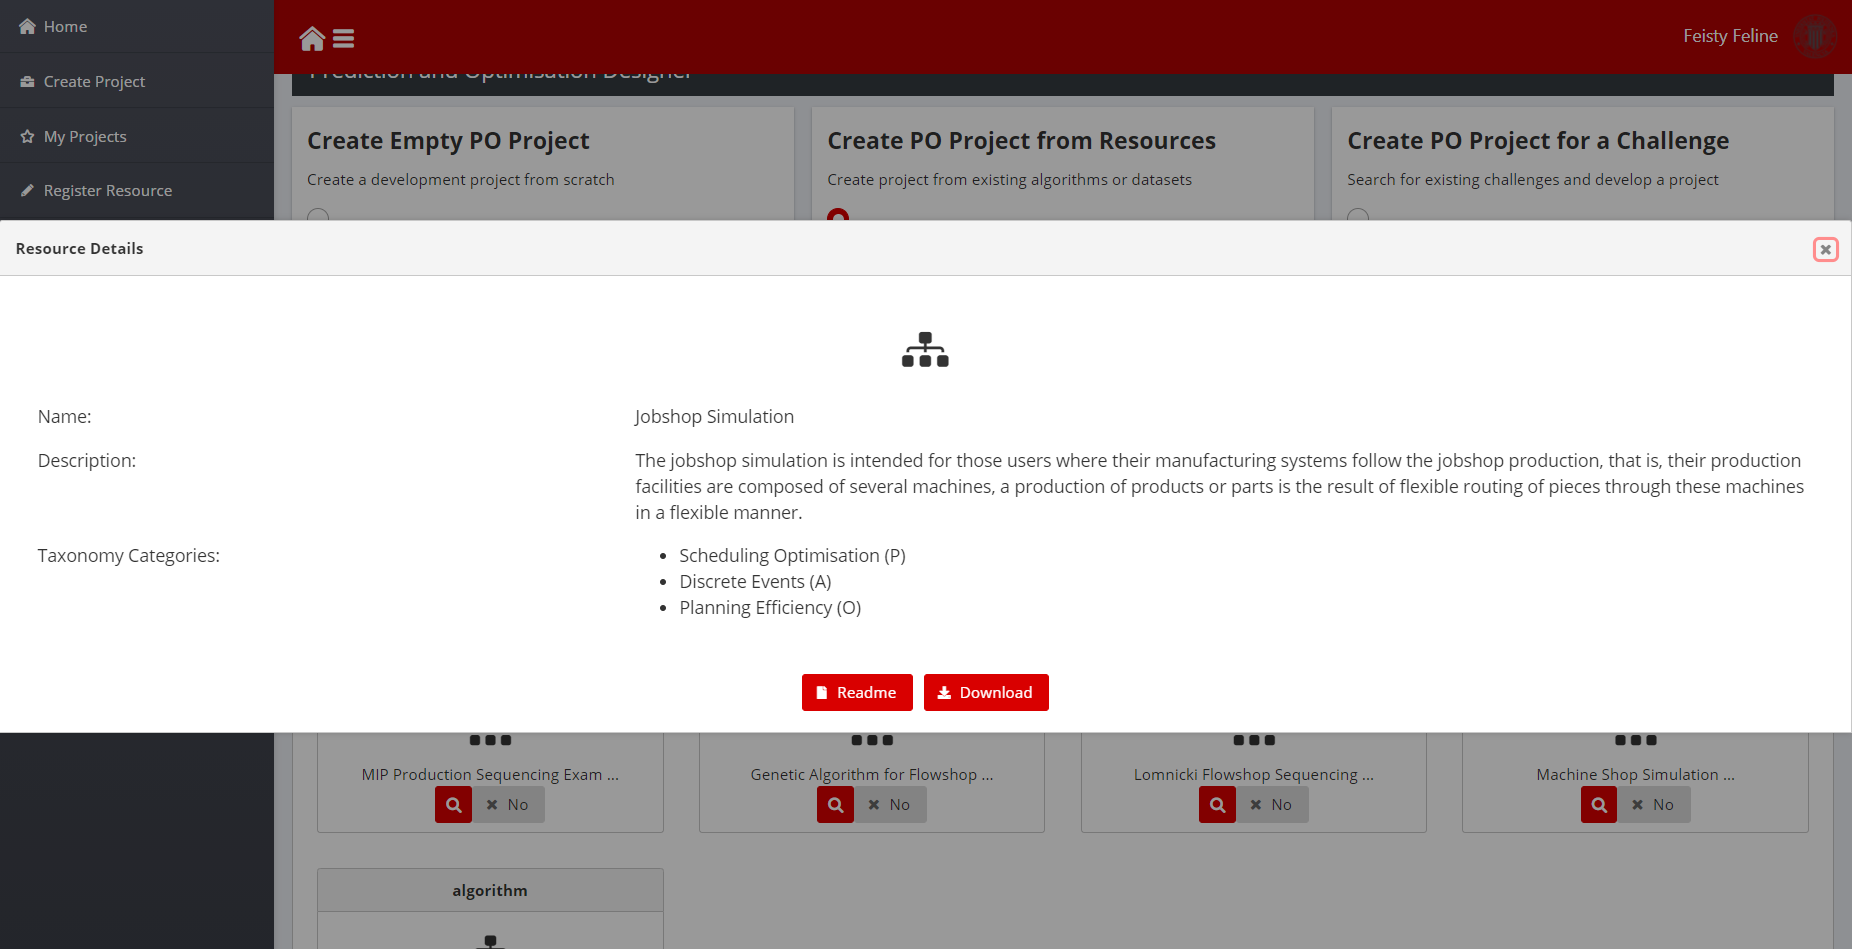
Figure 12: Model Detailed Information
- Now, developers can select one or several resources to import into their development project. To do that, just toggle the selection control from No, to Yes. Then, click on the Create Project Button. The selected resources should appear in the new confirmation screen. Now, all that is needed is to set up a name and description for the new development project you want to create. By clicking create, the PO Designer will create a new project, just as when the project is created from scratch, but adding the selected resources:
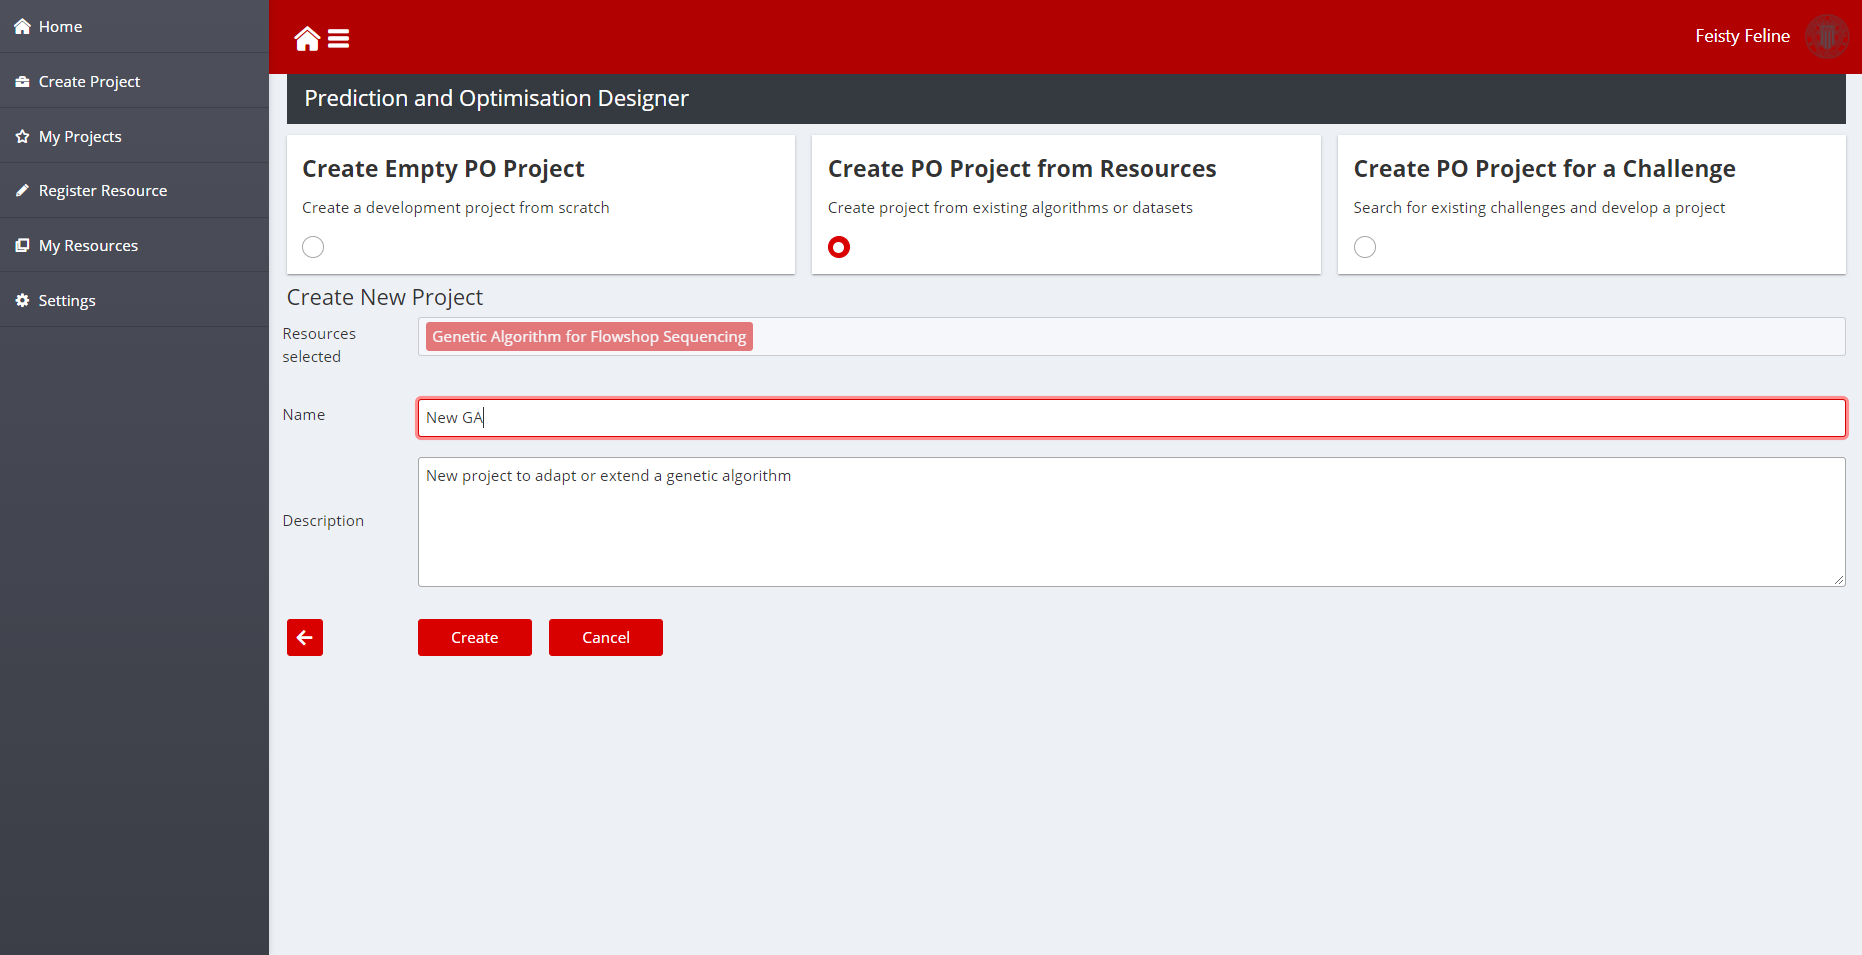
Figure 13: Project created with an existing layer
Create PO for a challenge
When developers wish to develop new zero-defect manufacturing techniques for solving a given problem, but they lack data to test their solutions, they can choose the Generate Project for a challenge. This option allows browsing existing datasets available in ZDMP as challenges submitted by final users. For instance, a developer with expertise on Production Planning Sequencing can search for datasets to generate a development project that will be completed with their implementation of a given optimiser.
The workflow for creating development project for a challenge is very similar to the workflow shown in previous sections:
Select the Create Project for a Challenge on the toolbox. A UI for selecting filters will appear. Enter keywords in the search bar or choose filters to use the zero defects manufacturing taxonomies describe above. After search criteria are entered, click on the search button (magnifier icon) to get the results
The details button (magnifier icon) shows a popup dialog with additional information about the dataset. Toggle the Yes/No button to add the dataset to a project.
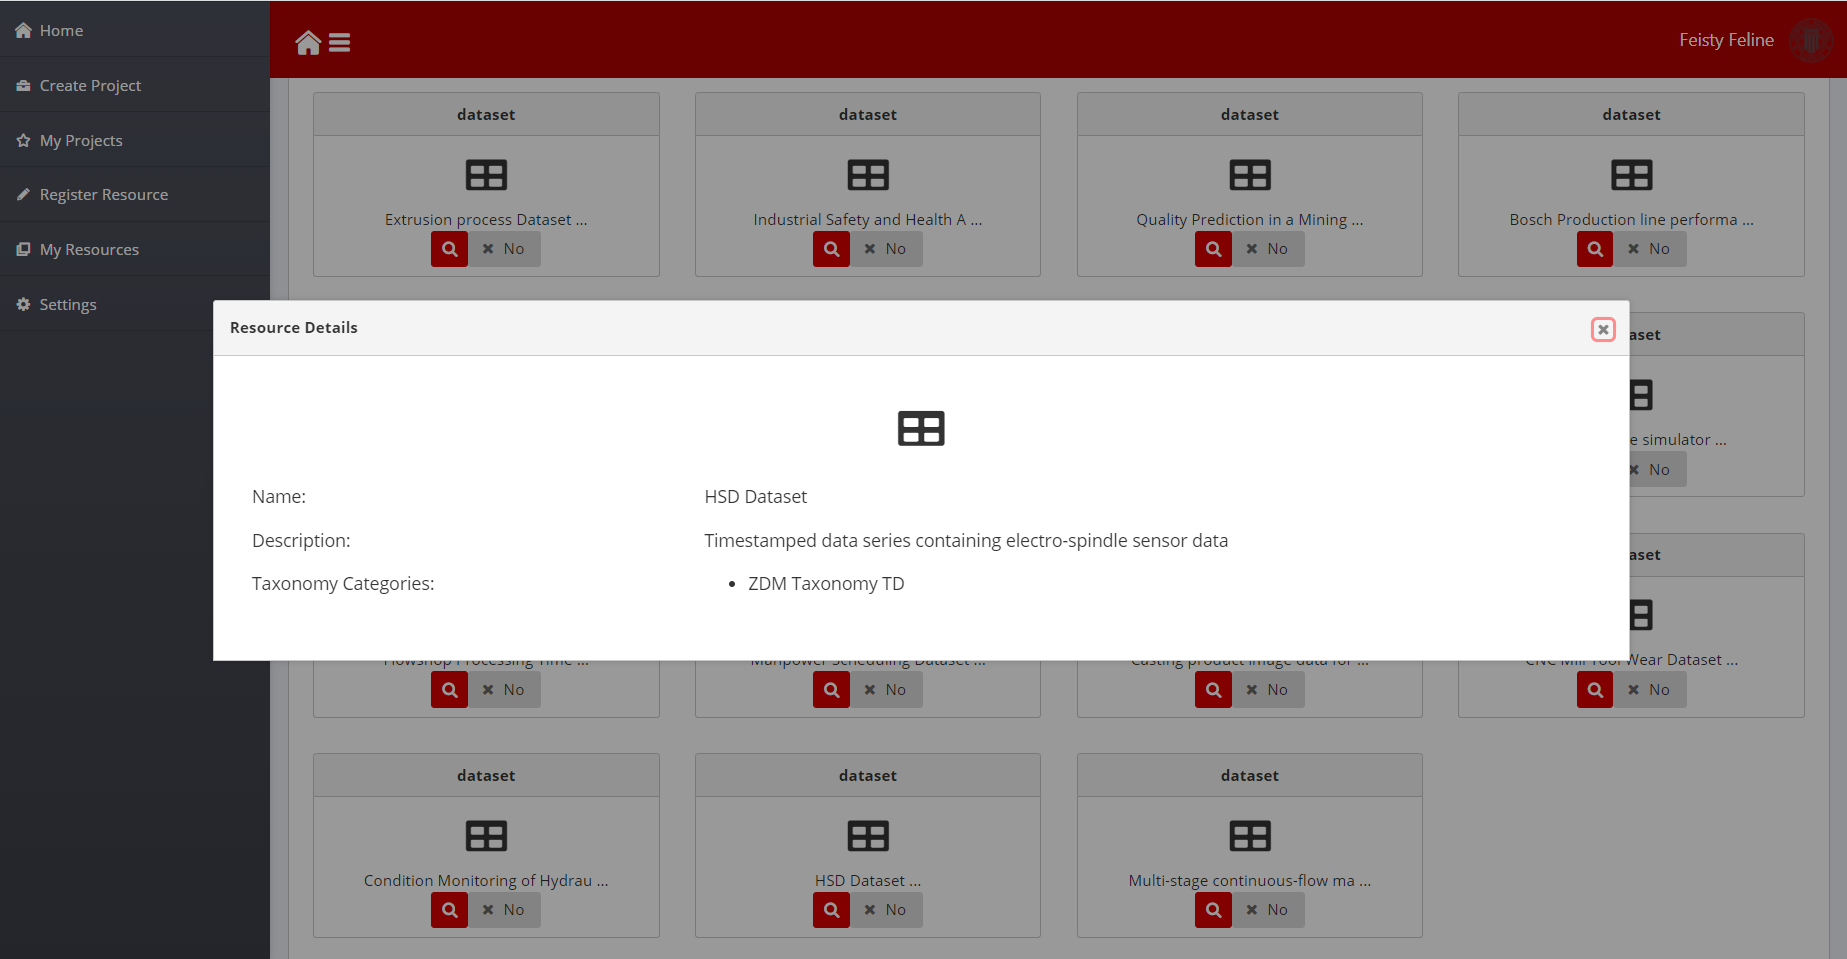
Figure 14: Dataset details
- Once the dataset has been selected, developers can click on create to create the project with the selected dataset, just as with resources.
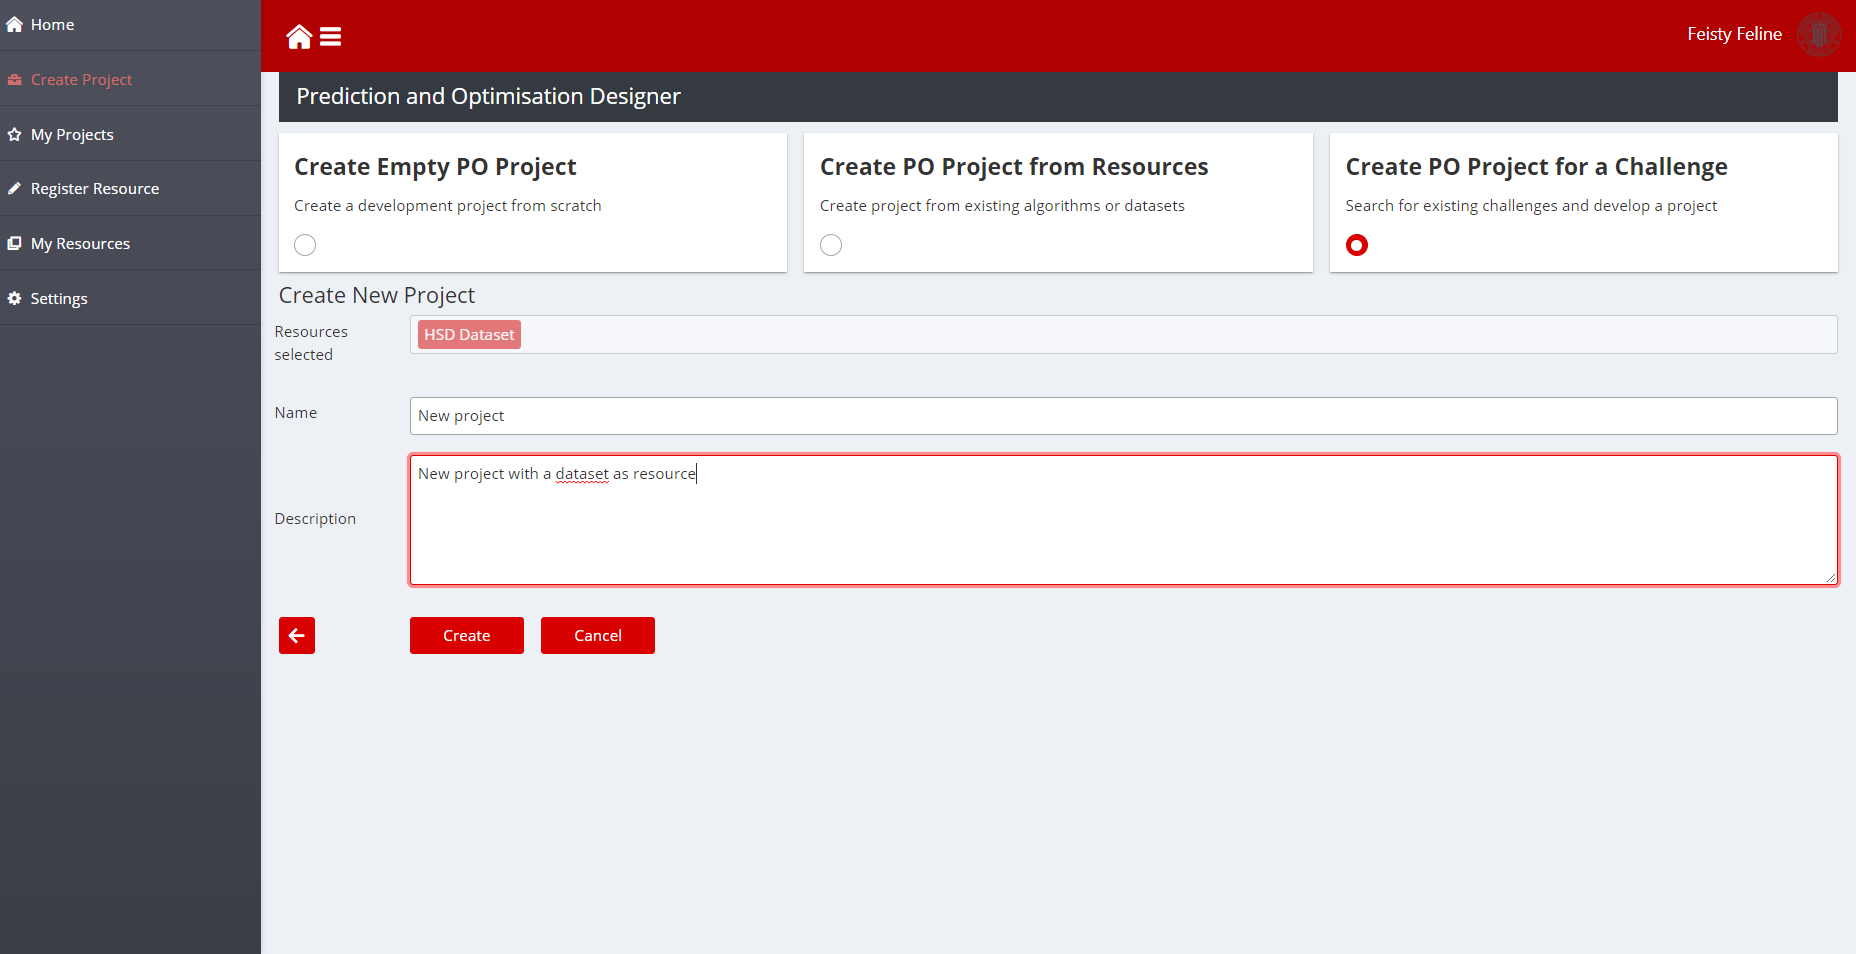
Figure 15: Project created with a dataset
Manage your Projects
The page “My Projects” provides a convenient interface to the projects in the group layers of an organisation. The page shows a dashboard with the list of its projects. The Details button (magnifier icon) that appears besides each project name loads the project details in the lateral panel, The URL opens up the project in the Human Collaboration GitLab.
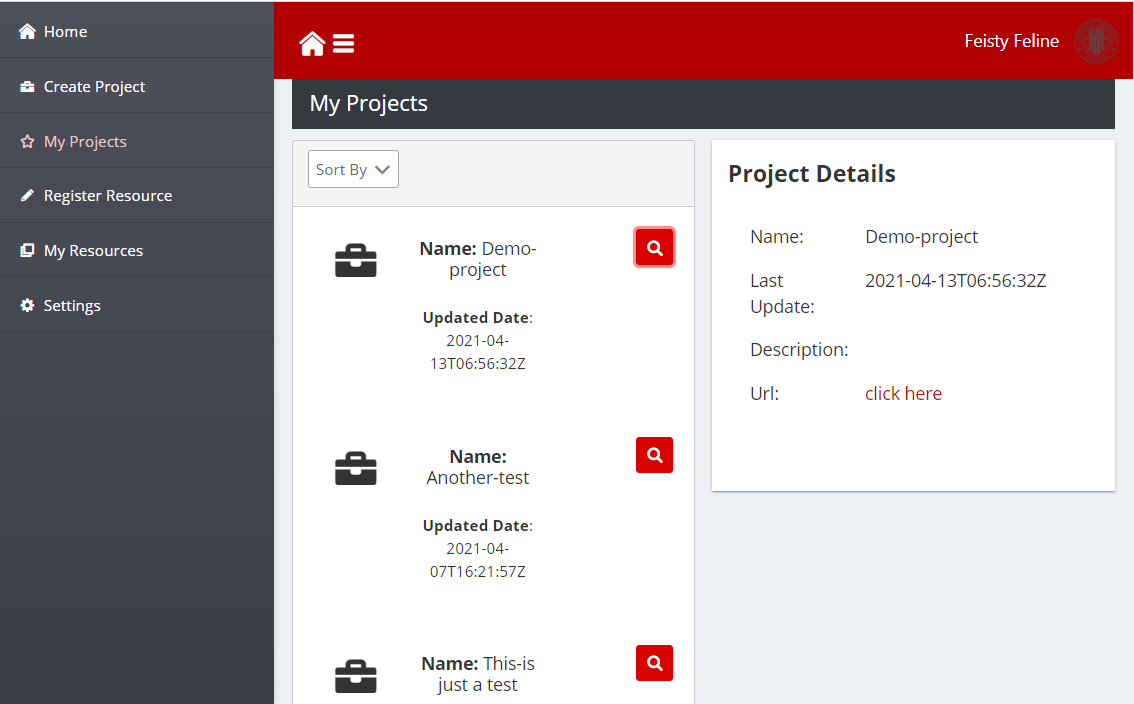
Figure 16: Manage your projects
Register a Resource
The Register Resource Page allows developers to index a new resource in the taxonomy. The page contains a form with the following fields:
Name: Name of the layer as it should appear in the search engine for other developers
Type: Type of the resource, either Model for PO layers, or dataset for datasets
URL: URL of the open-source project of the layer or the resource location of the dataset
Description: Description of the resource
Domain: Zero defects manufacturing problem domain (problem that the layers solves or that the dataset can be used to)
Objective: Sustainability objective that the layer helps to improve (Only for Model types)
Algorithm: Algorithm type the layer is based in (Only for algorithms)
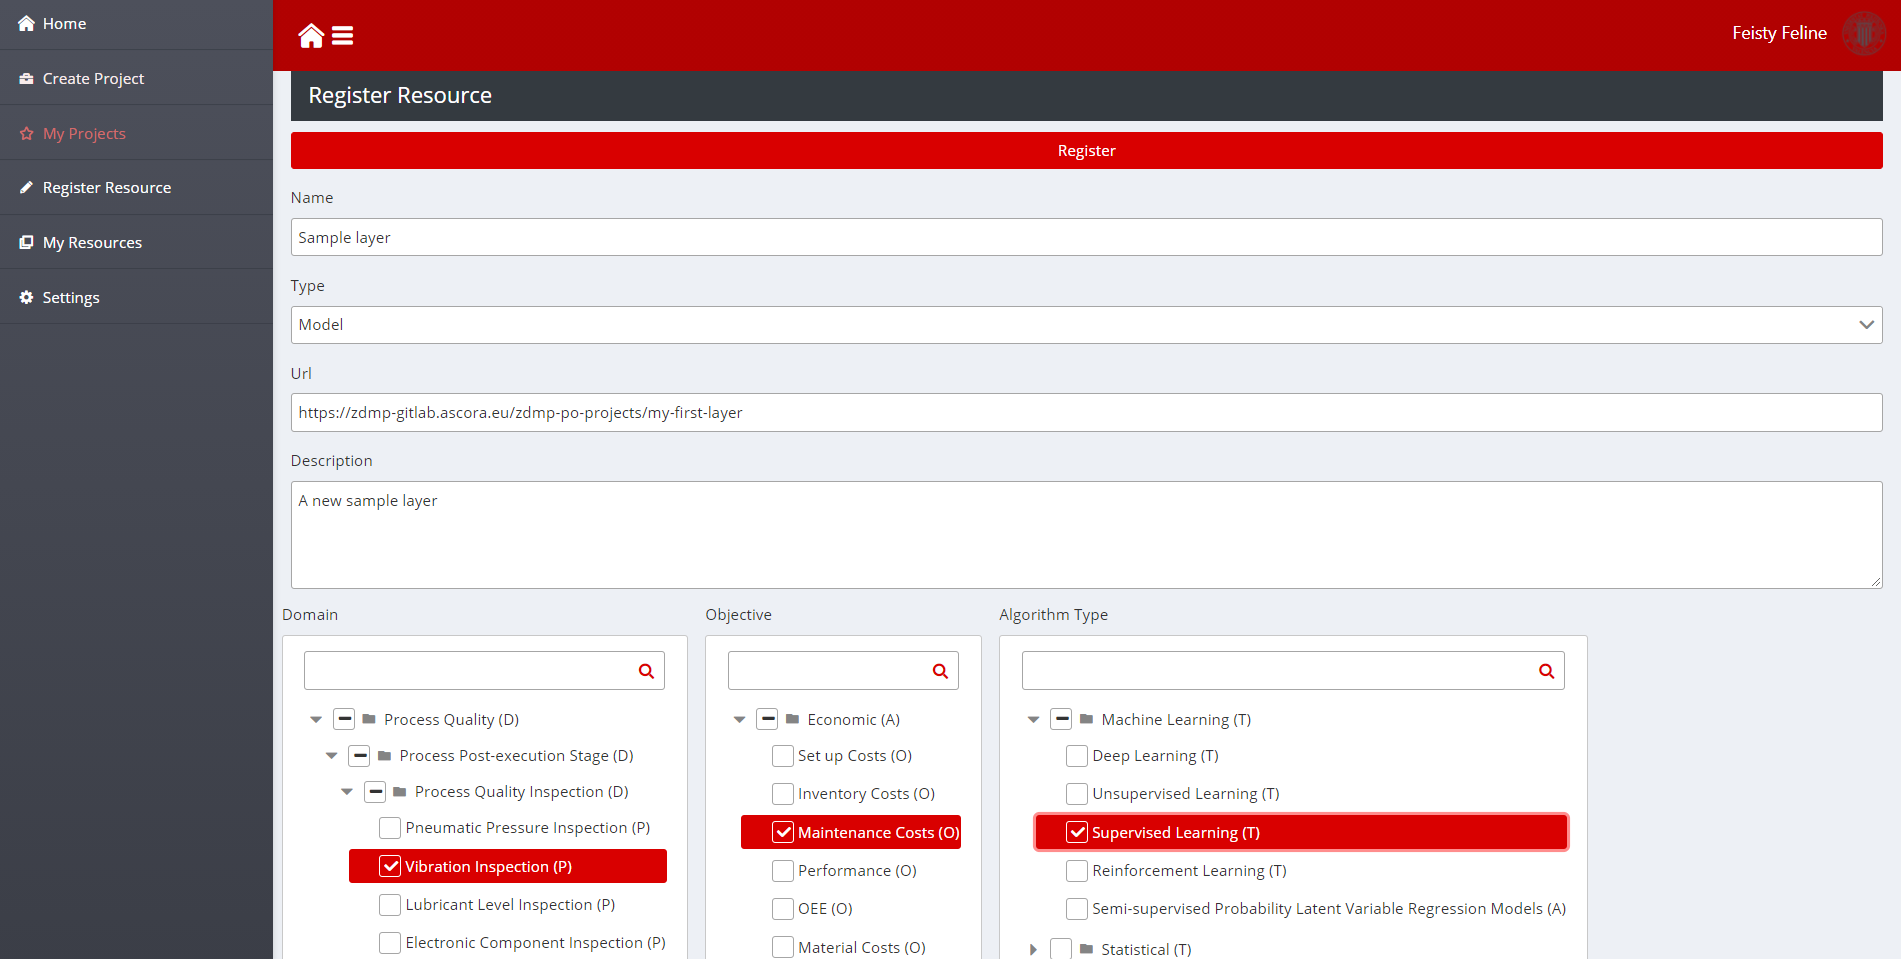
Figure 17: Register new resource
Manage your Resources
The page “My Resources” lists the resources that an organisation has indexed in the search engine. The design is similar to the My Projects Page. The dashboard shows the list of resources published by an organisation. If the Details button besides the name is clicked (magnifier icon), the detailed information is loaded into the Resource Details panel to the right.
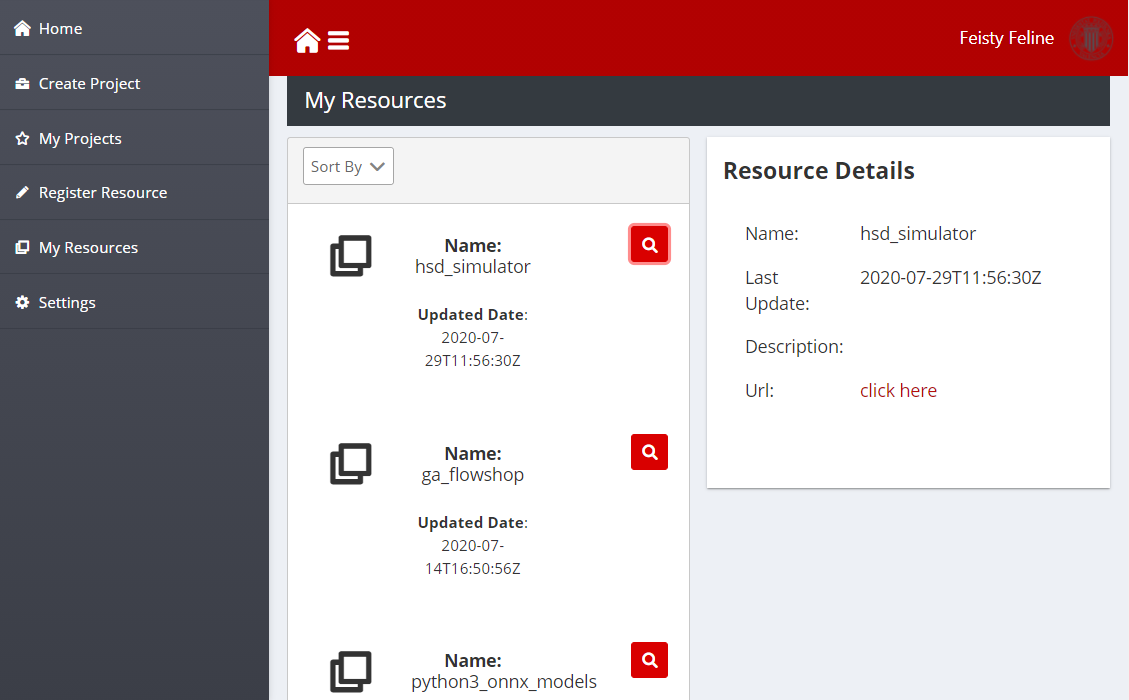
Figure 18: Manage your resource page
Settings
The settings page allows developers to integrate the PO Designer with any GitLab repository, although primarily the intended use is to integrate with the instance hosted in the Human Collaboration Hub. Regardless, the required parameter settings needed for an organisation are:
Base URL: Base URL of the GitLab instance
Token: A valid GitLab Token that can be used to connect to the GitLab API
Layer Group Name (Optional): Layers and datasets are grouped into a GitLab project group, and this parameter settings can be used to change the default group name for a layer(s)
Group Id (Optional): The Group Id of an existing project allows to organise layers
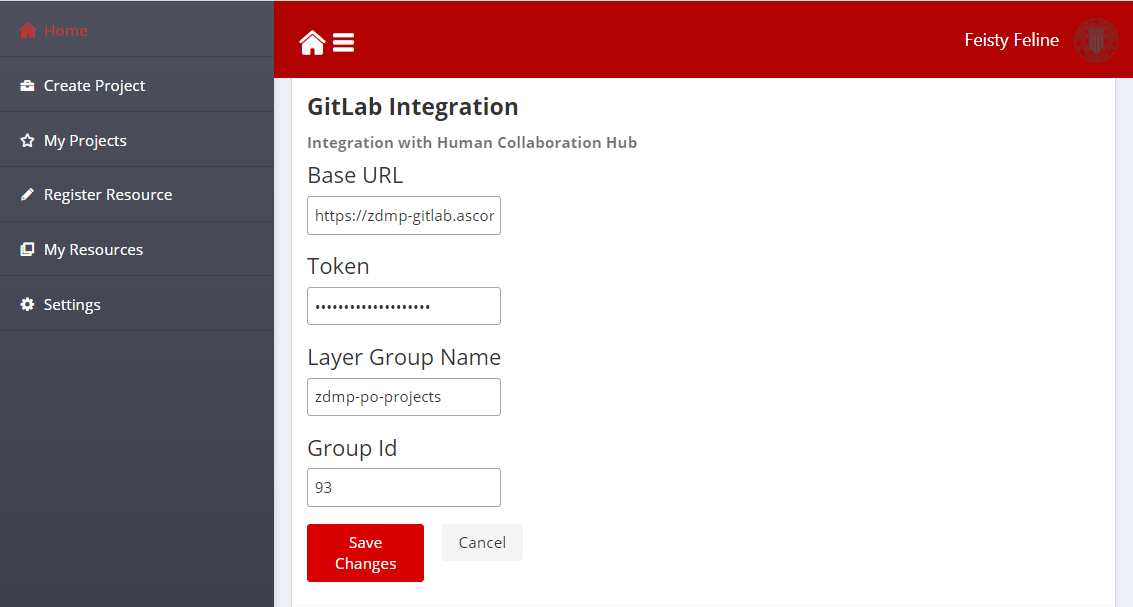
Figure 19: Project Created from Existing Model