Secure Authentication and Authorisation
General Description
This module provides Authentication and Authorisation for ZDMP assets (eg users, components, zApps, etc). In case of a successful authentication, an associated access token is issued to the corresponding ZDMP asset, which would later be used for authorization. This module provides: Identity Service (for authentication), Authorisation service (for authorization), and basic intrusion detection service (for detecting unauthorized requests to protected resources).
| Resource | Location |
|---|---|
| Source Code | Link |
| Latest Release (v1.0.0) | Download |
| X Open API Spec | Link |
| Video | Link |
| Further Guidance | Tutorial |
| Related Datasets | None |
| Additional Links | None |
| Generation date of this content | 6 May 2021 |
The date of generation of this component content is: 6 May 2021
Screenshots
The following images are illustrative screen shots of the component.
Figure 1: Secure authentication and authorization overview
Component Author(s)
| Company Name | ZDMP Acronym | Website | Logo |
|---|---|---|---|
| IKERLAN | IKER | www.ikerlan.es |  |
Commercial Information
| Resource | Location |
|---|---|
| IPR Link | Link |
| Price | [For determination at end of project] |
| Licence | [For determination at end of project] |
| Privacy Policy | [For determination at end of project] |
| Volume license | [For determination at end of project] |
Architecture Diagram
The following diagram shows the position of this component in the ZDMP architecture.
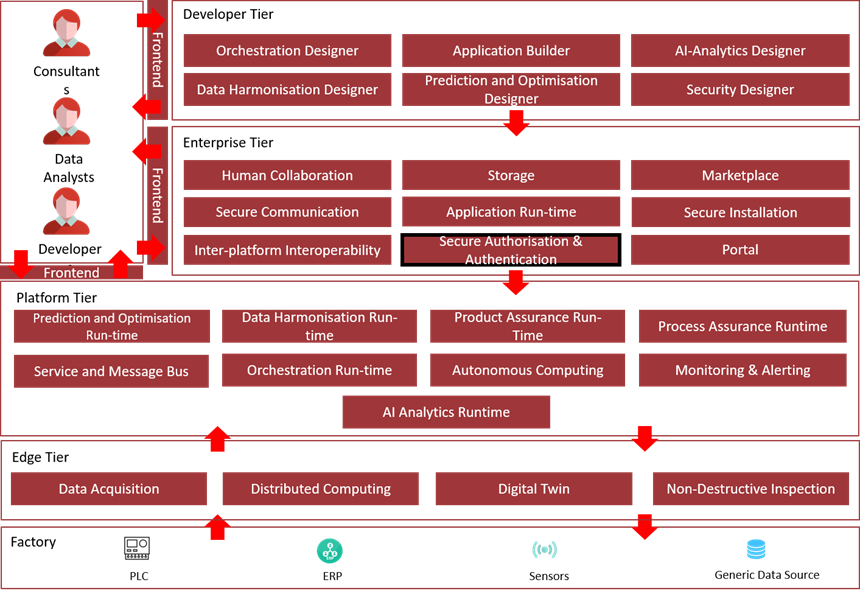
Figure 2: Position of Component in ZDMP Architecture
Benefits
Manage users, roles, groups mapping centrally and manage access to protected resources easily
Provide context-based authentication so that additional authentication factors are only asked if the context of the user has changed
Features
The functions and features of the Identity Service are the following:
Authentication analyses: Authentication requests are analysed to decide if they are legitimate or not: once the evaluations have been conducted, a decision is made and if the authentication is valid, an access token is granted. This access token is used subsequently in the authorisation process
ZDMP asset info and credentials management: ZDMP asset (eg users, clients) information and the associated authentication credentials are stored
Token management: The issued access tokens are stored which are those associated to the different authenticated ZDMP assets
Auth logging: Every authentication attempt, successful or not, is registered. Events tracked are: Successful ZDMP asset logins, failed ZDMP asset logins, ZDMP asset account changes, Password changes
The functions and features of the Authorisation Service are the following:
Policy enforcement and decision: Every request made from a specific ZDMP asset is intercepted. The decisions are primarily based on the authorisation policies administrated
Policy administration: Authorisation policies are stored and retrieved when requested
Policy information provision: Additional attributes, coming from multiple sources, are retrieved to enable more informed decision during the authorisation process (based on Role-based Access Control (RBAC))
Multitenancy: The component at hand is able to store and manage data from different organizations (tenants)
The Intrusion Detection Service conducts certain verifications over each authorisation request. It provides the following features:
Detect suspicious activity: The Intrusion Detection Service monitors all communications among ZDMP assets and Authorisation Service to find out possible cases of cyberattacks
Logging suspicious activity: When the Intrusion Detection Service detects any suspicious activity, this module registers it in a secure log database, which can be analysed by the administrators
System Requirements
Minimal requirements needed:
Computer with Docker Engine installed (tested in v19.03.8, on Windows)
The average resources needed to run this component are: 2 CPUs, 2GB memory and 10GB free space on disk.
Associated ZDMP services
Required
Optional
- None
Installation
The installation of this component is performed through Docker commands to run docker images. The Secure Authentication and Authorisation component can be installed via docker-compose:
Download the latest source code from ZDMP’s GitLab repository Download
Unzip the folder in the desired workspace
Through the command line, go to the orchestration folder and run docker-compose command as follows:
zdmpadmin@localhost: cd t5.2-secure-authentication-and-authorization-master/orchestration
zdmpadmin@localhost:~$ docker-compose up -d
This deploys three docker containers in the host machine where the docker-compose up -d command was launched.
How to use
There are two possible UIs that can be used to manage the secure authentication and authorization component. The first UI is the one provided by Keycloak itself, while the other, is the one provided by the Security Command Centre.
Keycloak UI:
After installation, the Authentication and Authorisation service UI is available at: http://localhost:8080/auth. The browser would render the following page:

Figure 3: Keycloak’ s welcome page
Click on the “Administration console”, which redirects to the admin login form:
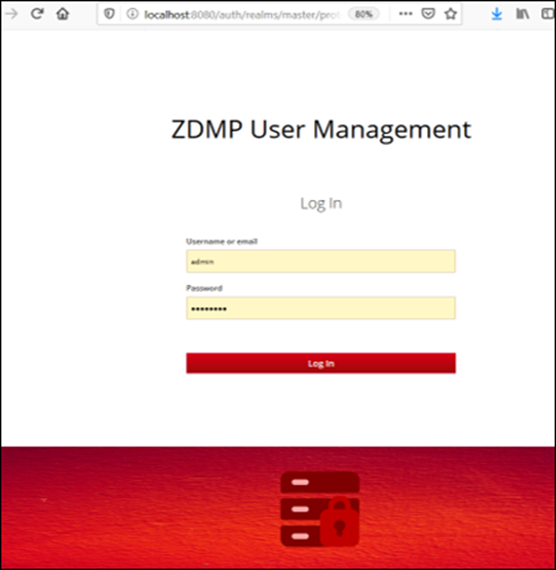
Figure 4: key cloak’s authentication UI
The credentials to access the administration console are the following:
Username: admin
Password: Pa55w0rd
These credentials are intended to be used by the IT administrator deploying the component, ie an IT administrator of a supplier company. Herein, the IT administrator can have access/view to all its client’s organizations.
By default, the Authentication and Authorisation component is initialized with a fictitious company named “testCompany” so that supplier IT administrator can evaluate what the component offers. Afterwards, the supplier company’s clients can create organizations from the portal, which programmatically creates a “realm” for that client in the Authentication and Authorisation component.
Secure Command Centre
To manage users, roles, groups, and clients within the secure command centre, the user is required to login with the appropriate credentials. It is important to have a logged user with the ZDMP_IT_Security_Commander role.
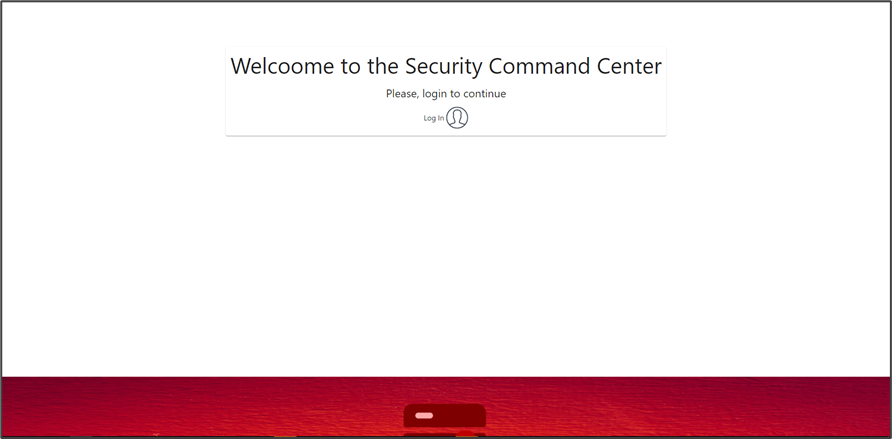
Figure 5: Security command centre welcome page
Manage users
Keycloak UI
The Authentication and Authorization component allows the creation of users for a given organization. When an organization is created through the Portal, the IT admin of that company can access the Authentication and Authorisation component and create more users within its realm (See next).
By clicking on the left menu “Users”, the list of users is displayed. Initially, there would only be one user registered: the IT administrator user who created the organization account through the portal.

Figure 6: Keycloak’s registered users
The admin can create more users by clicking on the upper right button “Add user”, which prompts the following form:
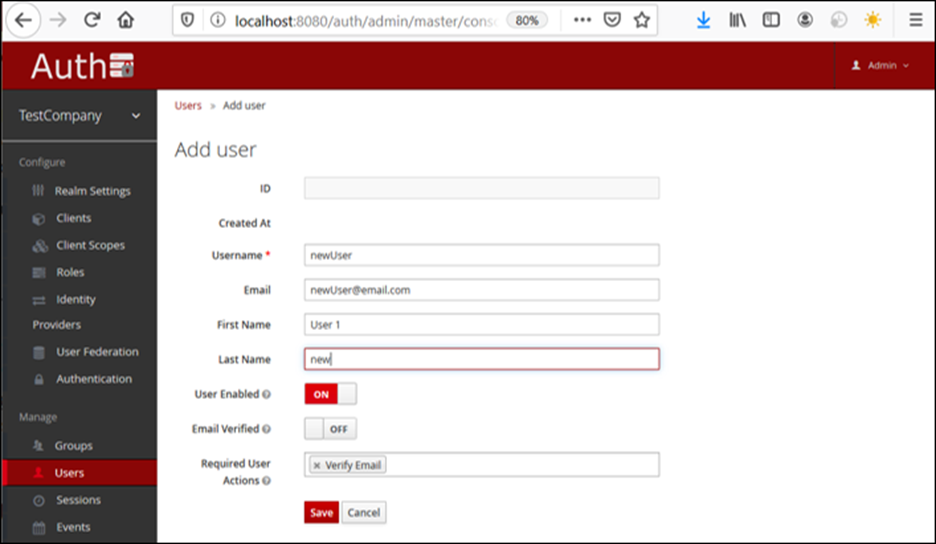
Figure 7: Registering a new Keycloak user
Additionally, the IT admin user can configure additional properties, such as the ZDMP roles the user is mapped to. By default, the Secure Authentication and Authorisation component comes with a set of predefined roles, so that mapping users to roles is straightforward and the access to core components can be given.
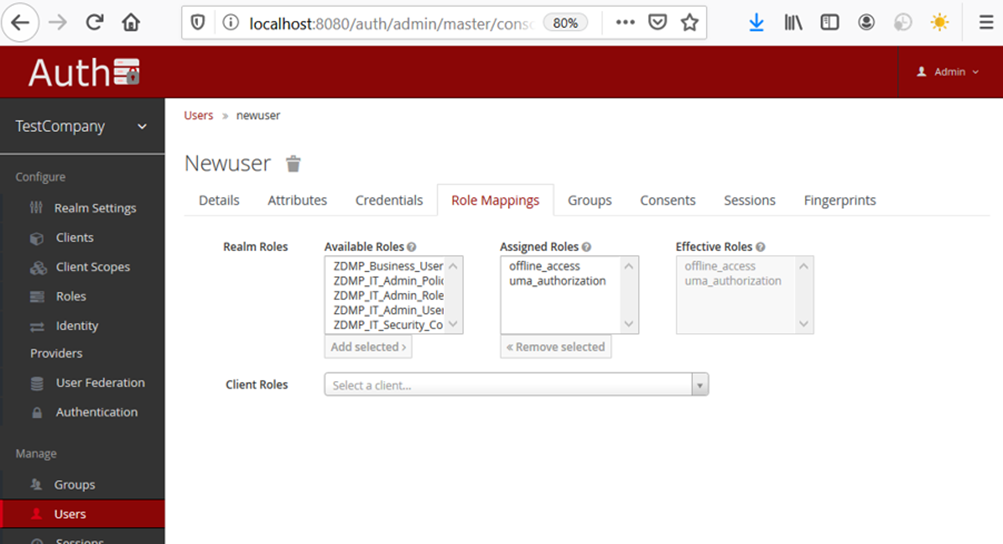
Figure 8: Keycloak role mapping
Security Command Centre
The security command centre also exposes aspects of Keycloak’s user management capabilities. The first view contains all the created users displaying the most relevant information.
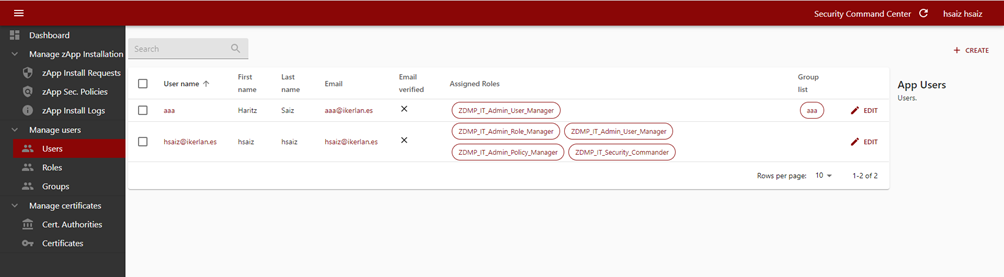
Figure 9: Security command centre user list
The admin user is able to inspect a user’s information such as email/username, assigned roles and groups.

Figure 10: Inspecting a user’s information
In the same way, an admin user can delete or edit a user’s information. While editing a user, new roles and groups can be assigned (as well as removing them).
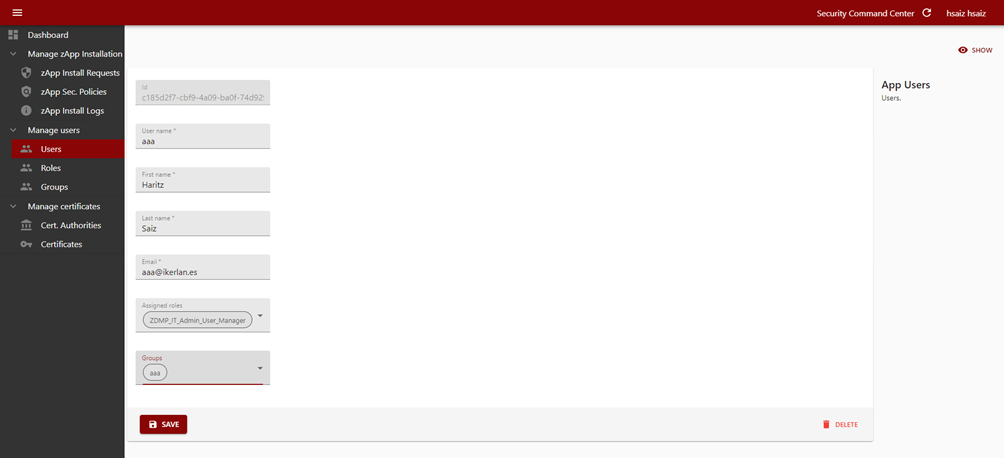
Figure 11: Registering a new user
Manage roles
Keycloak UI
If more roles are needed (to manage access control to resources) the Authentication and Authorisation component provides forms to create them. These can later be mapped to users as already shown.
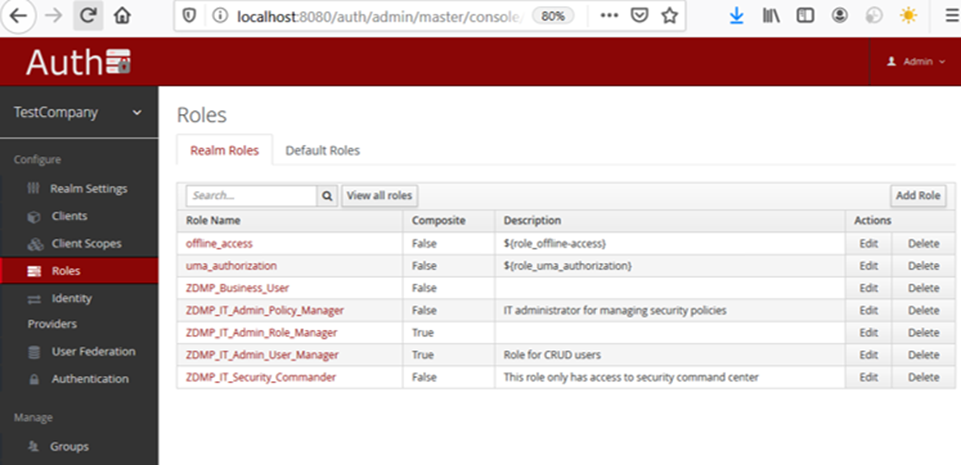
Figure 12: Keycloak role list
Security Command Centre
The security command centre also allows for role management. There are two types of roles: Organization roles and Client roles. The role list panel differentiates between those two types of roles.
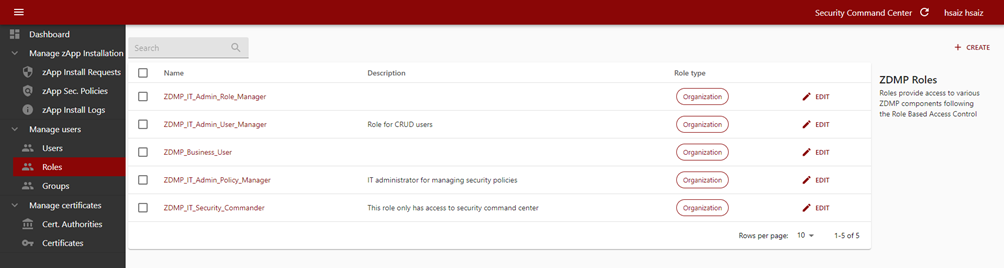
Figure 13: Security command centre role list
During the role creation, the admin user needs to specify the role type. The most generic role is the Organization one.
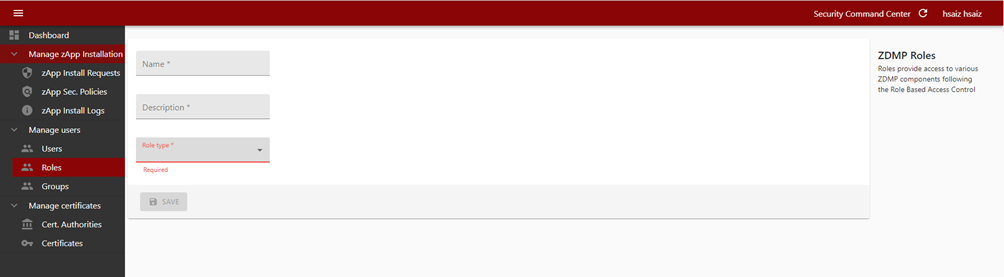
Figure 14: Creating a new role through the Security command centre
Finally, the admin user can edit a role modifying basic information plus defining composite roles, which is defining the inheritance mechanisms.

Figure 15: Modifying a role through the Security command centre
Manage clients/applications
By default, on company account creation, there is already a set of ZDMP applications registered in the Secure Authentication and Authorisation component (eg ZDMP portal, ZDMP Marketplace), as shown in the image below. Eventually, more clients/applications might be listed, eg when zApps are installed into the company, a new entry appears in the list below.
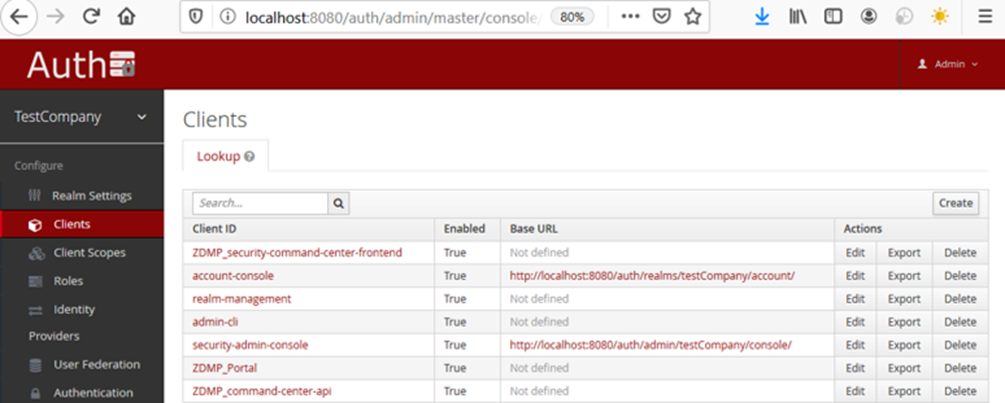
Figure 16: Keycloak’s registered clients
Interface to Authentication and Authorization module
Other ZDMP components can programmatically access the Secure Authentication and Authorisation component, for both authentication and authorisation purposes, as well as, to CRUD users, roles, security policies. To enable this, the component provides a REST API interface. Please check online Open API specification.
An Insomnia collection, that groups every API call, is provided. This can be used to test each endpoint separately. The collection assumes the user runs the Docker Compose file in localhost (if not, it can be performed by editing the calls with the correct URL). After importing the file to Insomnia, the flowing endpoints are loaded, which can later be executed:
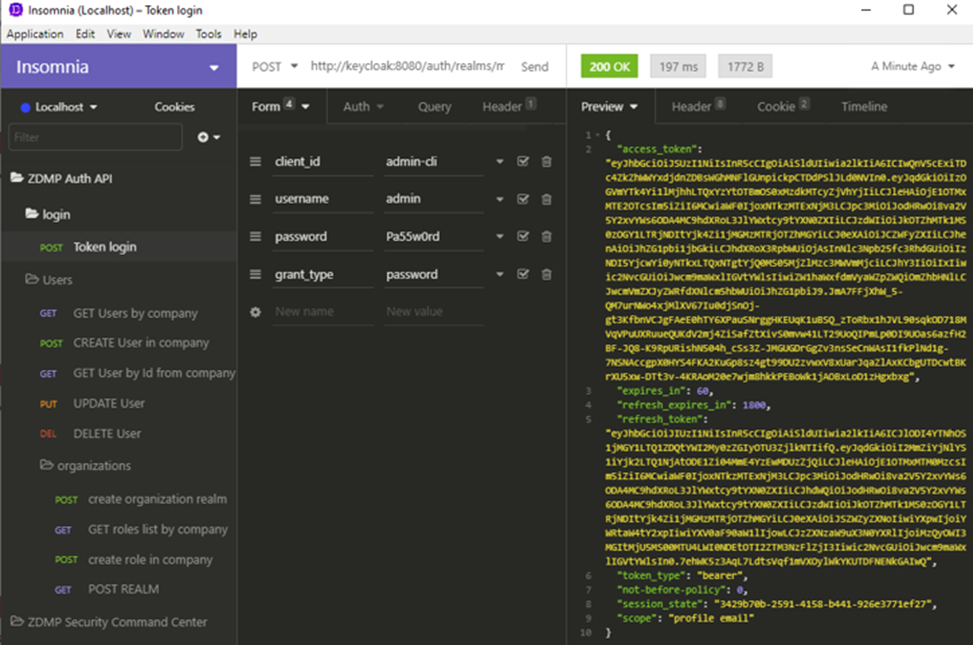
Figure 17: API request for obtaining a valid JWT token
The first API endpoint “token login” can be used to generate a valid access token for authentication purposes (see figure 17 the “access token” response field). Once the token is generated, it can later be used for authorization to protected resources by embedding it into the “Authorization” HTTP Header, following the OAuth 2.0 flow as defined in the following diagram:
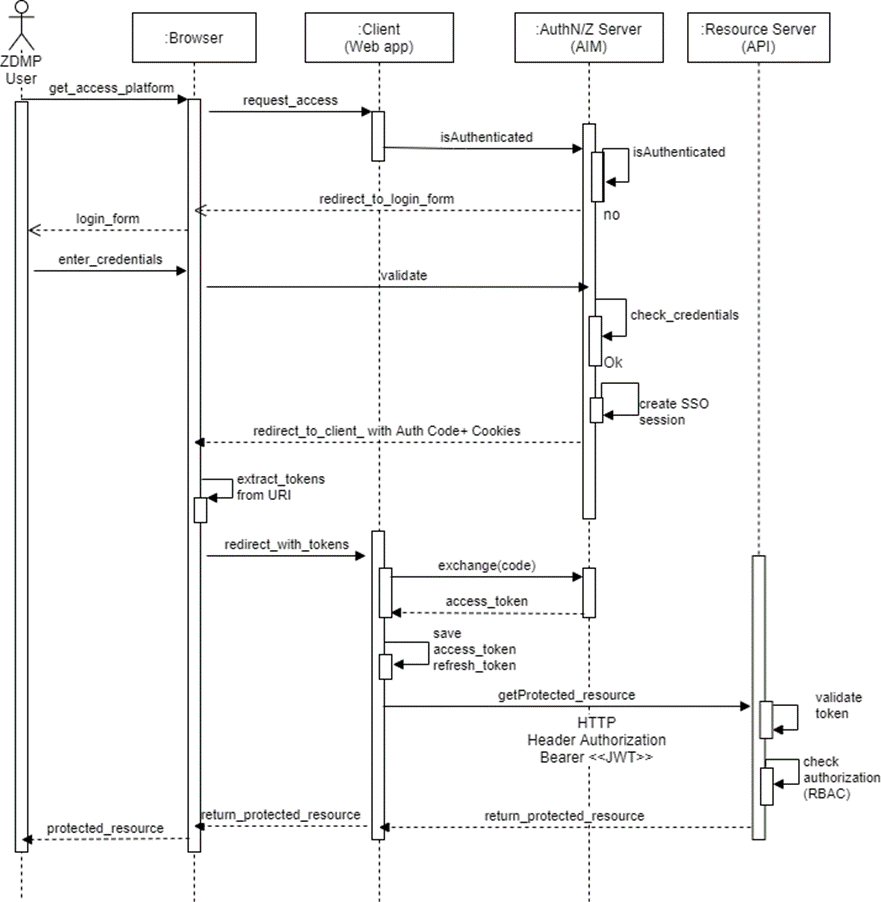
Figure 18: Sequence diagram for obtaining a valid JWT token
Enabling CBA authentication
Context-based authentication (CBA) is a custom module that triggers a second factor authentication during the authentication process when suspicious logins are detected by the server. By default, it is not enabled, so users are only required to introduce a single factor to log in to ZDMP components (that single factor is user and password). If CBA is enabled, then the user who wishes to log in to ZDMP components, in addition to user and password factor, would need to introduce an OTP (One Time Password) factor. OTP is the secure authentication and authorisation module which detects that the user is trying to log from a different location (eg country), different device (eg laptop, mobile) or different period (at night rather than morning).
Configuration steps for IT administrator
The following are the steps to enable the module and configure it:
- Enable the CBA themes in the realm. Go to the realm setting tab and from the drop-down menu select “Ikerlan-cba-red” theme and click on “Save” when done.
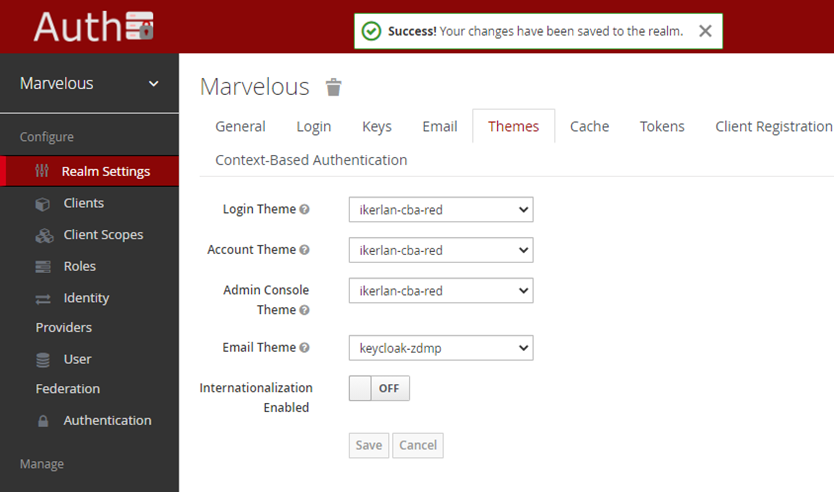
Figure 19: Keycloak’s theme options
- Refresh the browser and a new tab “Context based Authentication” should be visible. Click on it and a form is displayed in which the setting for the CBA module can be configured. The most important parameter to set is the “Google geocoding API key”. This is needed so that the user location can be geo-localized. Without this, the CBA module does not properly work. The rest of the parameters can be set to defaults as follows:
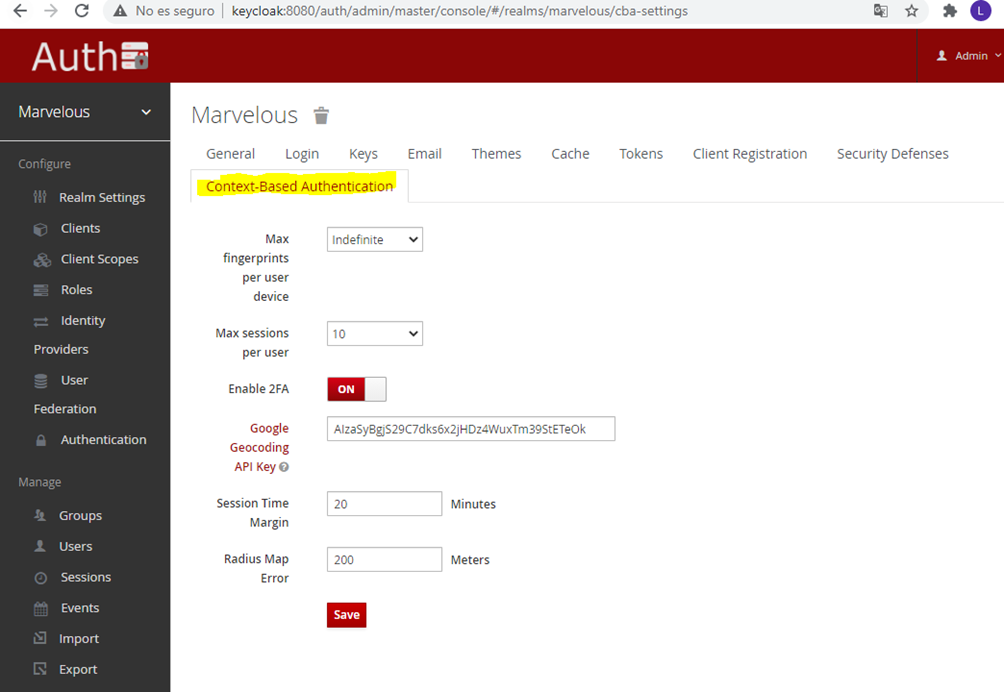
Figure 20: Keycloak’s CBA options
- Once the CBA auth module is enabled and configured (steps 1-2) the IT admin needs to create a new authentication flow that uses the CBA module. Click on the Authentication tab and click on new button as shown in the image:
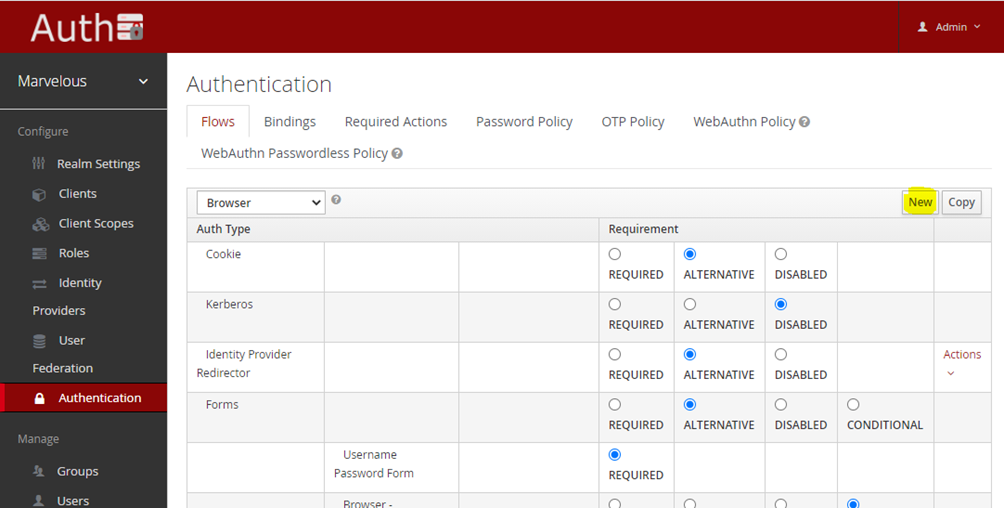
Figure 21: Configuring Keycloak’s CBA authentication flow
- Give an alias to the newly created flow: eg “cba-authentication” and click on “save”
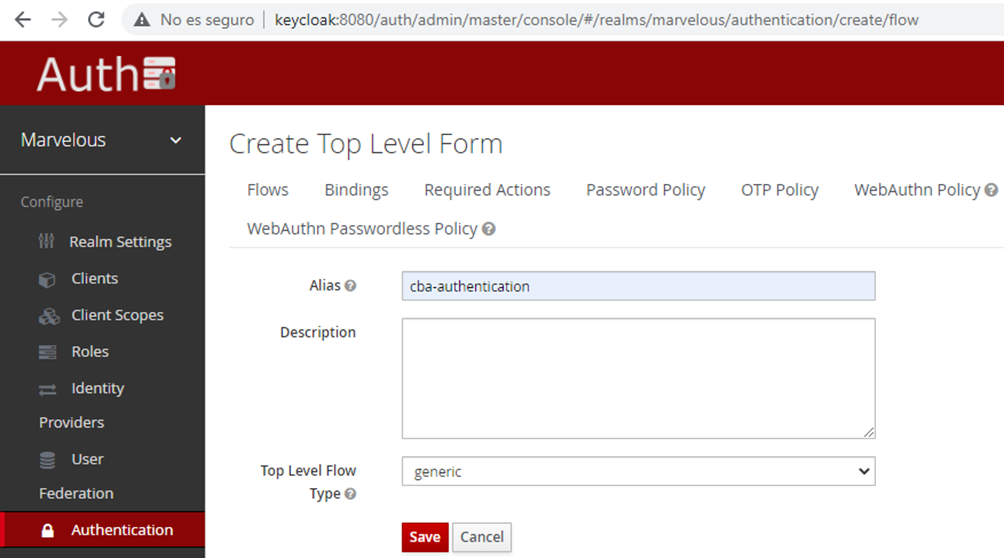
Figure 22: Modifying Keycloak’s authentication flow alias
- Add a new execution by clicking on the “Add execution” button:
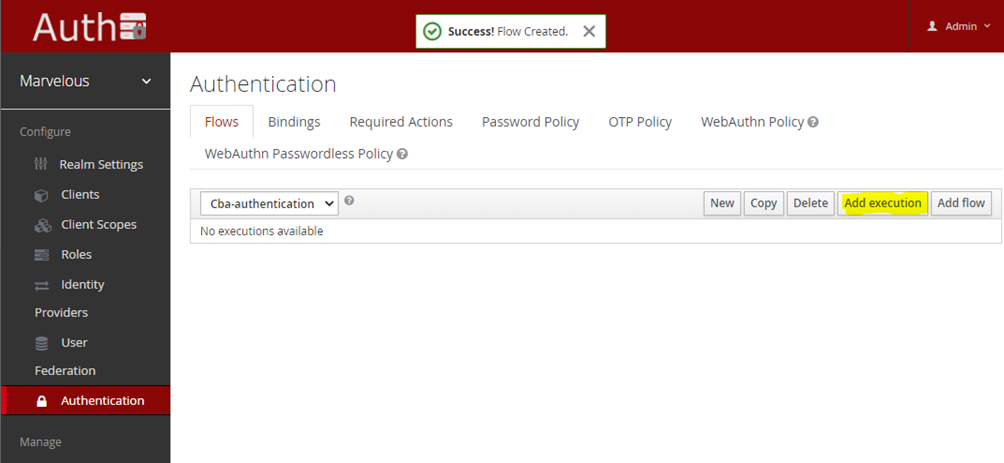
Figure 23: Adding a new flow execution
- From the drop-down menu select the “Context based Authentication” provider, click on the “save” button, and make it “required”:
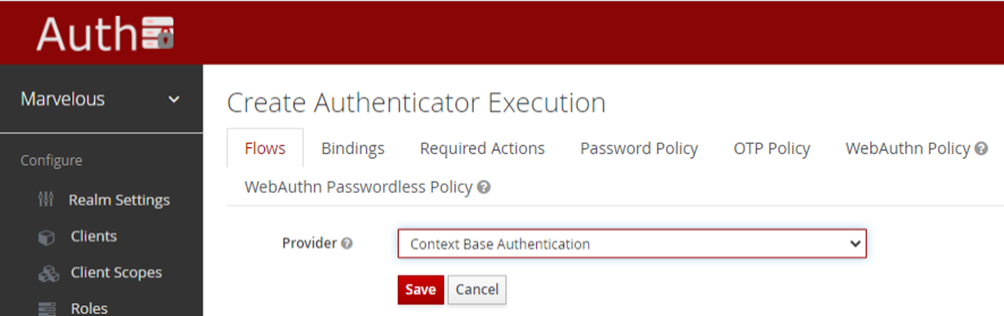
Figure 24: Selecting CBA’s authentication provider
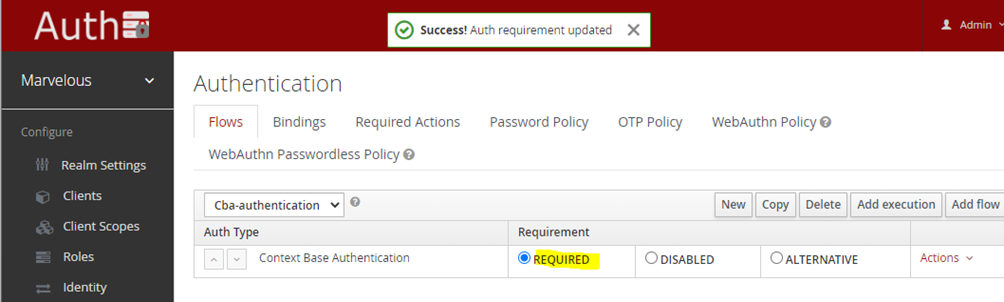
Figure 25: Configuring Keycloak’s authentication flow
- Bind the newly created flow to the Browser login flow, so that any ZDMP component based on web technology has the CBA login on.
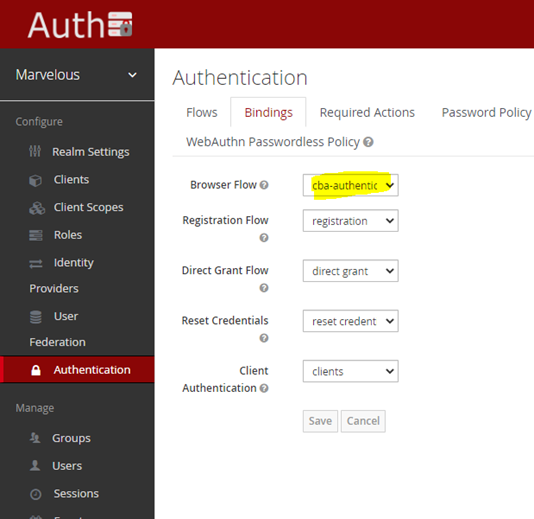
Figure 26: Modifying Keycloak’s authentication bindings
The IT admins can retrieve, for each user registered, the information that the CBA module is tracking.
The fingerprint tab holds the device fingerprints of the user’s device, ie identifies which device the user has used to log in to different ZDMP components and the geolocation.
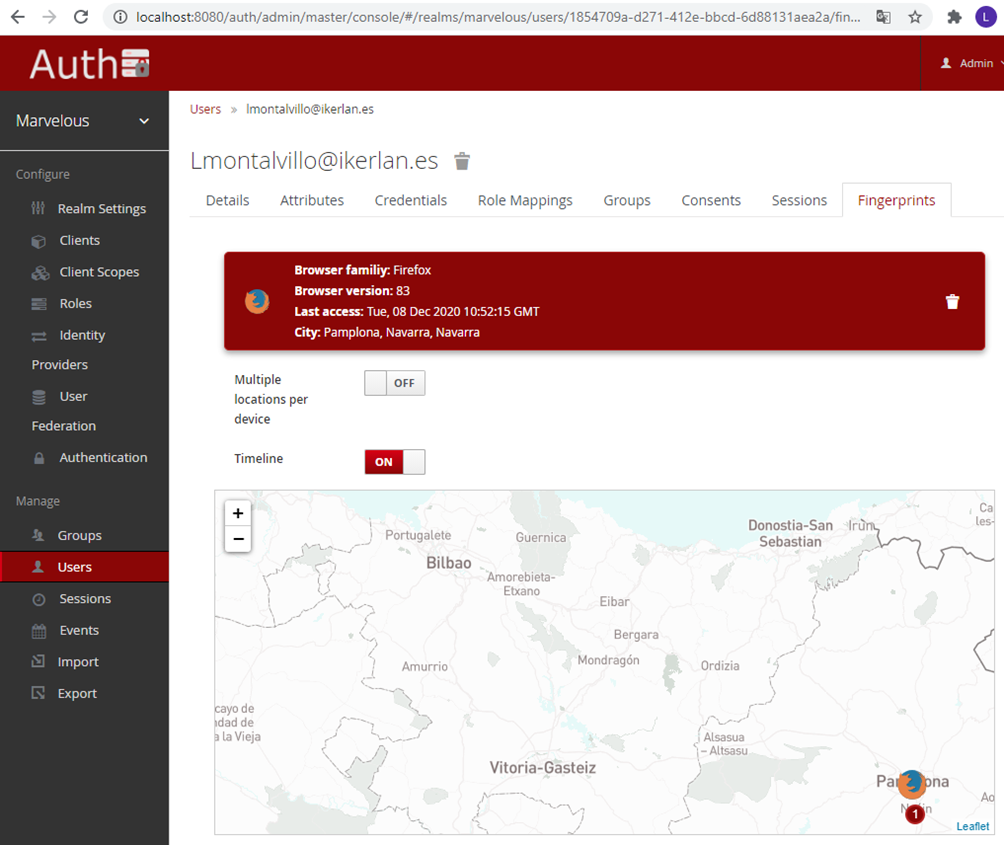
Figure 27: CBA fingerprint UI
The session tab holds the period in which a given user accesses the ZDMP platform.
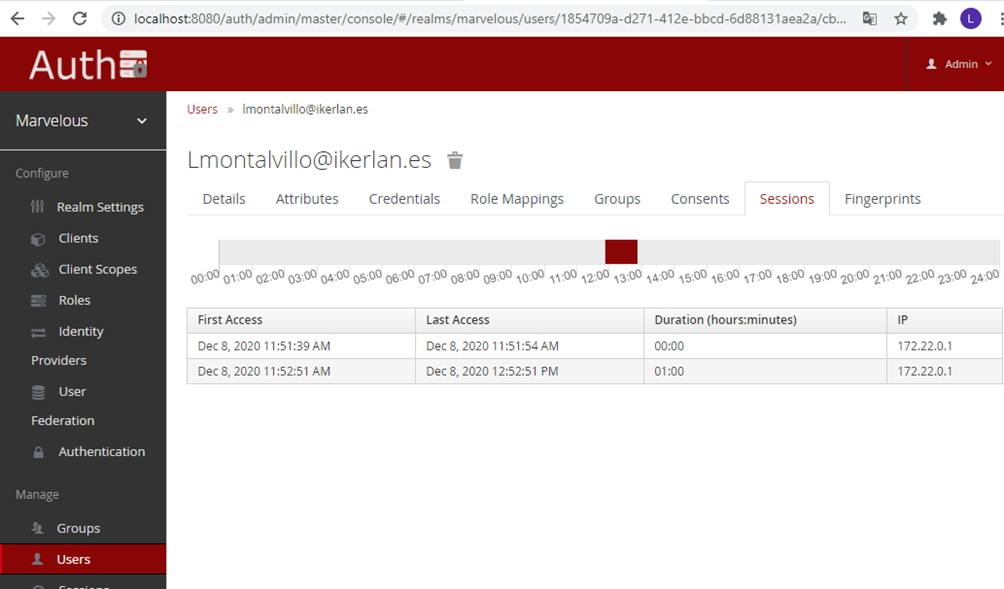
Figure 28: CBA sessions UI
Configuration steps for users
The CBA module tracks user information when they log in (device fingerprint, location, access timestamp), in a transparent way. If the context known by the authentication and authorization server w.r.t the user that logs in has changed, it requests the user to introduce an OPT code (One-time Password). Hence users need to have installed an OTP application in their mobile phone - either Google Authenticator or FreeOTP.
When users logs in to the ZDMP platform for the first time they are prompted with the following screen, and they would need to scan the barcode with their phones and introduce the OPT code.
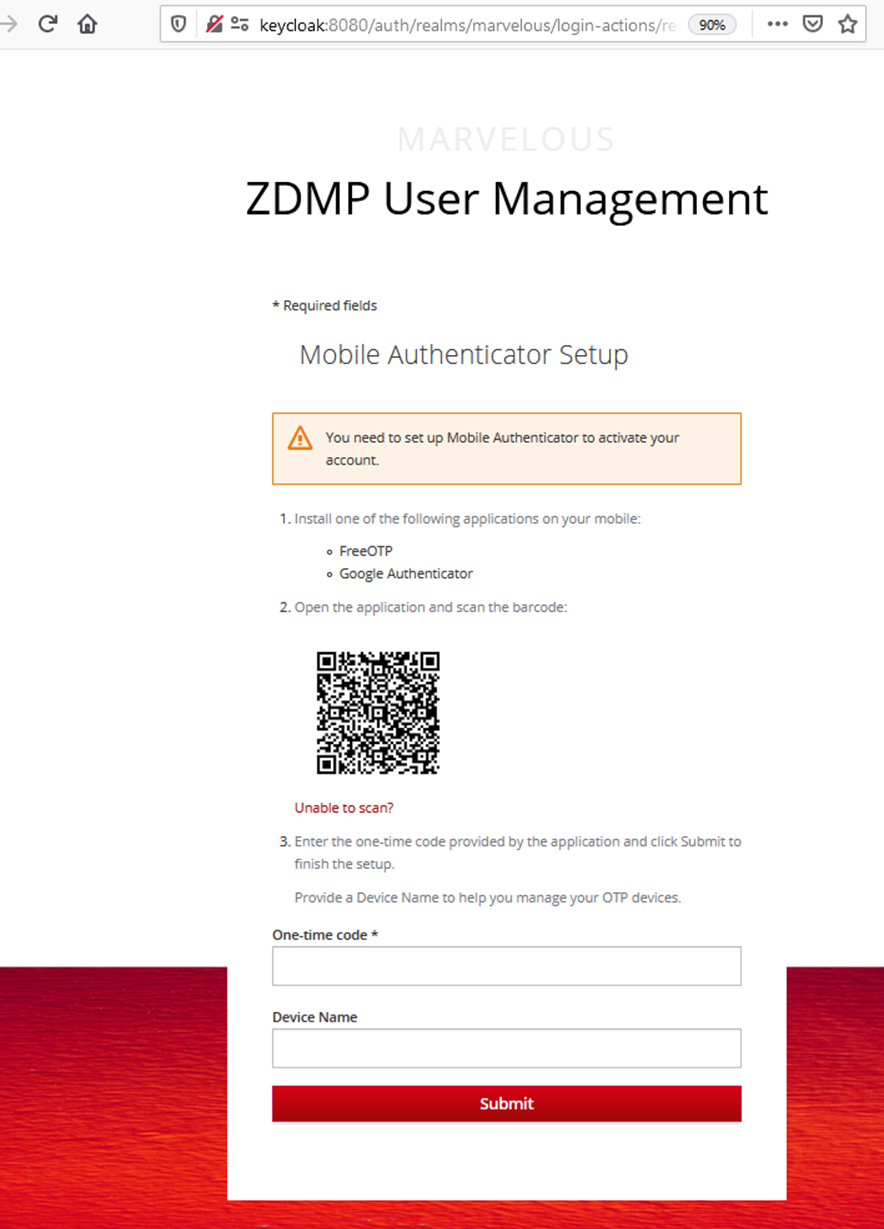
Figure 29: Configuring OTP authentication
From this point on, the users are prompted the username and password form as follows (where scripting techniques are used to track users’ contexts):
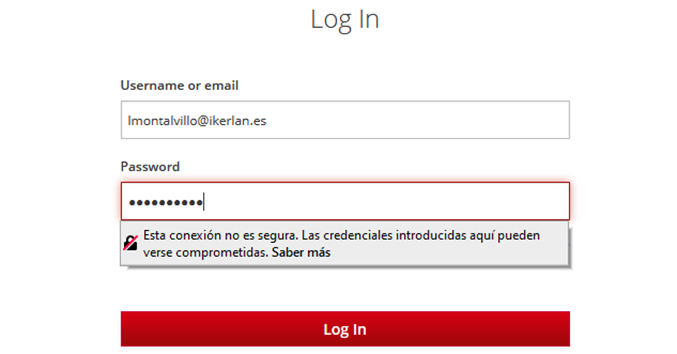
Figure 30: Logging in through Keycloak’s authentication form
Only if the context has changed the user is asked a second factor to prove her identity:
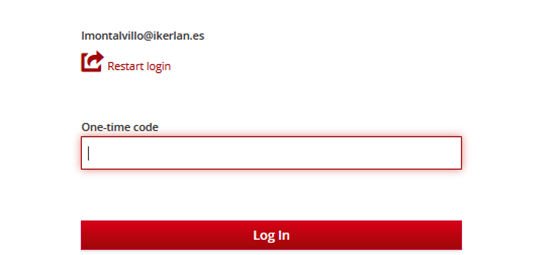
Figure 31Figure 30: Providing OTP code authentication form